- Africanu
- Albanese
- Amaricu
- Arabu
- Armenu
- Azerbaijani
- Vascu
- Belarusian
- Bengali
- Bosniacu
- Bulgaru
- Catalanu
- Cebuanu
- Cina
- Cina (Taiwan)
- Corsu
- Cruatu
- Ceccu
- Danese
- Ulandesa
- Inglese
- Esperantu
- Estone
- Finlandese
- Francese
- frisone
- Galizianu
- Georgianu
- Tedescu
- Grecu
- Gujarati
- Creolu Haitianu
- Hausa
- Hawaiianu
- Ebraicu
- Innò
- Miao
- Ungherese
- Islandesu
- igbo
- Indonesianu
- Irlandese
- Talianu
- Ghjappunese
- Giavanese
- Kannada
- Kazakh
- Khmer
- Rwanda
- Coreanu
- Curdu
- Kyrgyz
- U travagliu
- Latinu
- Lettone
- Littuanianu
- Lussemburghese
- Macedone
- Malgashi
- Malese
- Malayalam
- Maltese
- Maori
- Marathi
- Mongolianu
- Birmania
- Nepalese
- Novegese
- Novegese
- Occitanu
- Pashto
- Persianu
- Pulaccu
- Portughese
- Punjabi
- Rumenu
- Russu
- Samoanu
- gaelicu scozzese
- Serbianu
- Inglese
- Shona
- Sindhi
- Sinhala
- Sluvaccu
- Sluvenu
- Somalianu
- Spagnolu
- Sundanese
- Swahili
- Svedese
- Tagalog
- Tajik
- Tamil
- Tatar
- Telugu
- Thai
- Turcu
- Turchmennu
- Ucrainu
- Urdu
- Uighur
- Uzbek
- vietnamita
- gallese
- Aiutu
- Yiddish
- Yoruba
- Zulu
Apr. U 23 di u 2023 18:54 Torna à a lista
Cumu installà Chain Link Fence
Prima di principià
Scuprite s'è vo avete bisognu di ottene permessi di edificazione è di zonificazione.
A vostra recinzione risponderà à e restrizioni di atti di quartiere.
Stabbilisce e linee di pruprietà.
Fate situate e vostre utilità sotterranee. (Pulsu blu)
If you are having your fence installed by someone, are they covered by Workman’s Compensations Insurance?
Strumenti utili per installà una recinzione di catena
Tape Measure
Livellu
Pinze
Tagliafili
Martelletto
Post Hole Digger
Carriola, pala è zappa per mischjà è trasportu u béton
Seghetta o tagliatubi
String / Mason Line è Stakes
Chiave a mezzaluna
Fence Stretcher (puderà esse aduprata una putenza di tira, bloccu è tackle, o un dispositivu simili. A maiò parte di l'arnesi di stiratura di filu ponu esse prestitu o affittati in u locu).
|
Materiali Necessarii per Fence Chain Link Residenziale |
|||
|
Descrizzione |
Picture |
Quantità à aduprà |
Quantità à cumprà |
|
Tessutu di recinzione |
 |
Di solitu vendutu in rotuli di 50 piedi |
|
|
Top Rail |
 |
Filmatu tutale di recinzione senza aperture di cancelli |
|
|
Posti di linea (posti intermedi) |
 |
Divide u filmatu tutale per 10 è arrotonda (vede u graficu sottu) |
|
|
Terminal Posts (fini, anguli è posti di porta) (di solitu più grande di i posti di linea) |
 |
Cum'è necessariu (2 per ogni porta) |
|
|
Top Rail Sleeve |
 |
1 per ogni lunghezza di rail superiore pianu. Ùn hè micca necessariu per rail superiore swedged |
|
|
Loop Caps |
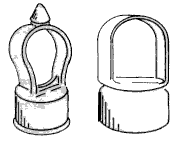 |
Aduprate 1 per post di linea (dui stili mostrati à manca) |
|
|
Barra di tensione |
 |
Aduprate 1 per ogni estremità o postu di porta, 2 per ogni postu d'angle |
|
|
Brace Band |
 |
Aduprate 1 per barra di tensione (tene l'estremità di a ferrovia in u locu) |
|
|
Rail Ends |
 |
Aduprate 1 per barra di tensione |
|
|
Banda di tensione |
 |
Aduprate 4 per barra di tensione o 1 per piede di altezza di fence |
|
|
Bulloni di trasportu 5/16" x 1 1/4" |
 |
Aduprate 1 per tensione o fascia |
|
|
Post Cap |
 |
Aduprate 1 per ogni post terminal |
|
|
Cravatta di recinzione / Legami di ganciu |
 |
1 per ogni 12 "di posti di linea è 1 per ogni 24" di rail superiore |
|
|
Camminate Porta |
 |
|
|
|
Porta Doppiu Drive |
 |
|
|
|
Cerniera Maschile / Cerniera Post |
 |
2 per porte uniche è 4 per porta doppia |
|
|
Bulloni di trasportu 3/8" x 3" |
 |
1 per cerniera maschile |
|
|
Cerniera Femmina / Cerniera Porta |
 |
2 per porte uniche è 4 per porta doppia |
|
|
Bullonu di trasportu 3/8" x 1 3/4" |
 |
1 per cerniera femminile |
|
|
Latch a forchetta |
 |
1 per porta di caminata |
|
Passu 1 - Survey Property Lines
Assicuratevi chì a fence ùn supera micca e linee di pruprietà. A maiò parte di l'installatori di fence ricumandenu chì tutti i posti sò stati apprussimatamente 4 "dentro a linea di a pruprietà. Questu avete aiutu à evità l'intrusione di a pruprietà adiacente cù pede di cimentu. Questu hè facilmente fattu stendendu una stringa longu a linea di pruprietà è mette i posti 4 "dentro.
Step 2 - Locate and set Terminal Posts (corner, end, and gate posts are called terminal posts)
A distanza trà i posti di a porta hè determinata aghjustendu a larghezza attuale di a porta più una indennità per cerniere è chjusi. Di solitu, i cancelli di camminata necessitanu 3 3/4 "per i cerniere è i scrocchi è i cancelli di doppia guida necessitanu 5 1/2". Dopu, scavà i buchi.
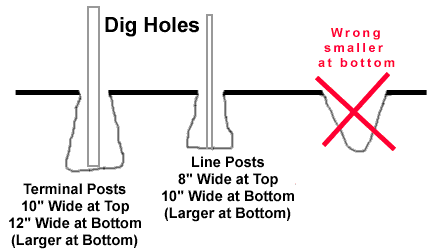
I posti terminali duveranu esse 2" più altu ch'è l'altitudine di u tessulu di fence è i posti di linea 2" più bassu di l'altitudine di u tessulu di fence (i posti terminali duveranu esse 4" più altu ch'è i posti di linea). mischju di cimentu. Pudete aduprà 1 parte di cimentu, 2 parte di sabbia, è 4 parte di ghiaia. Ci hè ancu cimentu pre-mix. Aduprate un livellu per assicurà chì i posti sò dritti. I posti deve esse centrati in u pirtusu. I posti di corona sò cusì. l'acqua sguasserà da i posti.
Passu 3 - Locate è stabilisce Line Posts
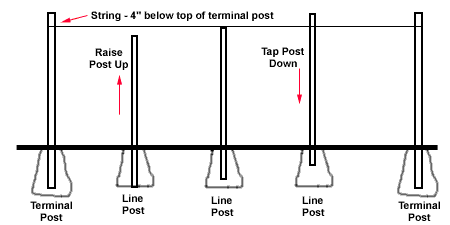
After the concrete around the terminal posts have hardened, stretch a string tight between the terminal posts. The string should be 4" below the top of the terminal posts. Line posts should not be spaced more than 10 feet apart. For example, if the length between two terminal posts is 30 feet, then line posts would be spaced 10 feet apart (see chart below). ig the post holes and set the line posts. Before concrete begins to set, adjust post height by moving post up or down. Top of the line posts should be even with the string. Check with level to make sure posts are straight.
Passu 4 - Apply Fittings to Terminal Posts
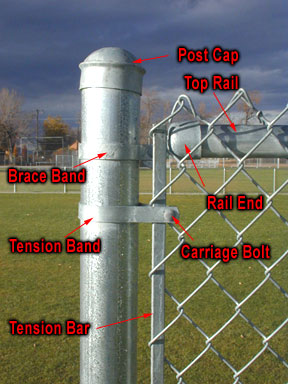
Verificate a lista di materiale è u graficu di raccordi sopra. Dopu chì tutti i posti sò stati installati è i pede di cimentu sò induriti, slip the tension and brace bands nantu à i posti terminali. A longa superficia plana di a banda di tensione deve esse rivolta versu l'esternu di a fence. Attenti à ùn sparghje o distorsioni i raccordi. Avà applicà i tappi terminali.
Passu 5 - Apply Top Rail
Attaccate tappi di loop à i posti di linea. Inserite una lunghezza di u tubu di u trenu superiore attraversu l'ochju più vicinu à unu di u terminal terminal. Trascinate l'estremità di a ferrovia nantu à l'estremità di u rail superiore è l'attaccate à un post termianl usendu a fascia di rinforzu (Se si usa rail superiore swedge, ùn inserisci micca l'estremità swedged in l'estremità di rail). Assicurate l'estremità di a ferrovia à a fascia di rinforzu cù un bullone di carru. Cuntinuà attachendu i rails superiori inseme. Se u rail superiore swedged ùn hè micca utilizatu, cunnetta l'estremità di u rail inseme usendu una manica superiore di rail. Quandu ghjunghjite à l'altru terminale, misurate cù cura è tagliate u rail superiore per adattassi strettu à l'estremità di a rail. Assicurate l'estremità di a ferrovia à u terminal terminal cù una fascia di rinforzu è un bullone di carri.
Passu 6 - Hang Chain Link Fabric
Srotolate a tela di a catena nantu à a terra longu a linea di fence. Trascinate a barra di tensione attraversu l'ultimu ligame nantu à a tela di a catena. Stand the fabric up and put it against the posts. Fissate a barra di tensione (chì avete appena inseritu) à u postu terminale cù bande di tensione (dighjà nantu à u postu). Aduprate i bulloni di carru cù a testa à l'esternu di a fence. Camminate longu u recintu è pigliate u slack. Attaccà a tela à u rail superiore cù uni pochi di fili.
To connect two sections or rolls of fence fabric together - take a single strand of wire from one of the sections of fence (Sometimes it is necessary to remove a second wire on the one end in order for the two sections to mesh properly.). Place the two section of fence next to each other (end on end). Join the two sections by winding (corkscrew fashion) the loose strand down through the fence. Join and tighten the knuckles at bottom and top. Now you shouldn't even be able to see where the two sections were connection together.
To remove excess chain link fence fabric - untie both top and bottom ends of fence (knuckles - pliers shown below). Twist the wire in a corkscrew fashion until the fence comes apart. One picket shown in red is turned until the fence is separated.
Passu 7 - Stretch Chain Link Fabric
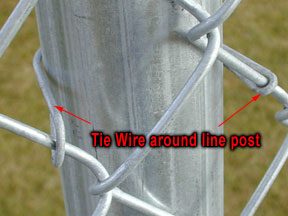
A tela deve esse digià fissata à l'estremità opposta di a fence. Inserite una barra di tensione (pò esse bisognu di una extra) à circa 3 piedi in l'estremità unattached di u tela. Fissate in modu sicuru una estremità di u stretcher di fence à a barra di tensione è l'altra estremità à u terminal terminal. Stretch the fabric - a tensione curretta deve permette una ligera quantità di dà quandu spressu da a manu. A cima di u tessulu deve esse situata à circa 1/2 "sopra a cima di u trenu. Aghjustate u tela à a lunghezza esatta aghjustendu o sguassate u filu cum'è citatu in u passu 6. Inserite una barra di tensione à a fine di u tela è cunnetta bandi di tensione in u terminal terminal. . Rimuovere la barella di recinzione. Attaccà i legami di filu à u rail superiore à 24" di distanza. Attach wire ties to posts 12" away. Stringe nuts on all brace and tension bands.
Passu 8 - Hanging Gates
Dopu chì a fence hè stata cumpletata, installate e cerniere maschili à unu di i posti di u cancellu, appiccicà a cerniera superiore cù u pin chì punta in giù è a cerniera in fondu cù u pin chì punta. Questu impediscerà chì a porta ùn sia alzata. Pone a porta in u locu, allineendu a cima di a porta cù a cima di a fence. Aghjustate è stringe e cerniere per permette un swing pienu. Installa una serratura di porta per porte singuli. I cancelli doppiu utilizanu a listessa prucedura, ma installate un dispositivu di scroccatura centrale (latch di forchetta).
Notes: Post depth can be determined by local weather and soil conditions, terminal posts are normally dug 10" wide and 18" to 30" deep. Depending on the wind and soil conditions you may want to use 8' centers or even a more narrow spacing for line posts. You may want to use longer line or terminal posts depending on the wind and soil conditions in your area. If you want to add privacy slats in the future, make sure the frame work will be strong enough for additional wind load.
Orange barrier fencing mesh is an extruded polypropylene plastic mesh fencing for cordoning off building sites, construction sites, sporting event areas and for general crowd and pedestrian control. Orange barrier fencing mesh is UV stabilised and a bright high visablity orange colour for maximum warning.
We offer various grades/weights of orange safty mesh fence.
Our light grade (110g/m²) and Medium grade (140g/m²) are stretched during the extrusion process to give them a very high tensile strength making them very robust for harsh building sites. Our heavy grade barrier mesh fencing (200g/m²) is unstretched and provides a far more visual orange fence.
|
Mudellu |
the rectangular hole |
the oval hole |
|||||
|
Mesh size(mm) |
70X40 |
90x26 |
100x26 |
100X40 |
65X35 |
70X40 |
80X65 |
|
Pesu |
80-400 g/m2 can be customized. |
||||||
|
Roll Width(m) |
1 m, 1,2 m, 1,22 m, 1,5 m, 1,8 m |
||||||
|
Roll Length(m) |
20-50-100m can be customized |
||||||
|
culore |
orange, yellow, green,blue etc. |
||||||
Applicazioni
§ Temporary fencing where an area needs to be cordonned off
§ Cordoning off construction sites / building sites
§ Temporary plastic fence for crowd control
Features
§ Lightweight and fast to install
§ UV Stabilised plastic mesh
§ High visibility orange mesh colour
§ Reusable - easily installed, easy to roll up and use again


