- แอฟริกัน
- ชาวแอลเบเนีย
- อัมฮาริก
- อาหรับ
- อาร์เมเนีย
- อาเซอร์ไบจาน
- บาสก์
- เบลารุส
- เบงกาลี
- บอสเนีย
- บัลแกเรีย
- ภาษาคาตาลัน
- เซบัวโน
- จีน
- จีน (ไต้หวัน)
- คอร์ซิกา
- ภาษาโครเอเชีย
- เช็ก
- ภาษาเดนมาร์ก
- ภาษาดัตช์
- ภาษาอังกฤษ
- ภาษาเอสเปรันโต
- เอสโตเนีย
- ภาษาฟินแลนด์
- ภาษาฝรั่งเศส
- ฟริเซียน
- ภาษากาลิเซีย
- จอร์เจีย
- ภาษาเยอรมัน
- กรีก
- คุชราต
- เฮติครีโอล
- เฮาซา
- ฮาวาย
- ภาษาฮีบรู
- ไม่
- แม้ว
- ฮังการี
- ภาษาไอซ์แลนด์
- อิกโบ
- ชาวอินโดนีเซีย
- ไอริช
- ภาษาอิตาลี
- ญี่ปุ่น
- ภาษาชวา
- กันนาดา
- คาซัค
- เขมร
- รวันดา
- เกาหลี
- เคิร์ด
- คีร์กีซ
- แรงงาน
- ภาษาละติน
- ลัตเวีย
- ลิทัวเนีย
- ลักเซมเบิร์ก
- มาซิโดเนีย
- มัลกาชิ
- มาเลย์
- มาลายาลัม
- มอลทีส
- ชาวเมารี
- ฐี
- มองโกเลีย
- พม่า
- เนปาล
- นอร์เวย์
- นอร์เวย์
- อ็อกซิตัน
- ภาษาพาชโต
- เปอร์เซีย
- ขัด
- โปรตุเกส
- ภาษาปัญจาบ
- ภาษาโรมาเนีย
- รัสเซีย
- ซามัว
- ภาษาเกลิคของสกอตแลนด์
- เซอร์เบีย
- ภาษาอังกฤษ
- โชนา
- สินธุ
- สิงหล
- สโลวาเกีย
- ภาษาสโลวีเนีย
- โซมาลี
- สเปน
- ชาวซุนดา
- ภาษาสวาฮีลี
- สวีเดน
- ภาษาตากาล็อก
- ทาจิกิสถาน
- ทมิฬ
- ตาตาร์
- กู
- แบบไทย
- ตุรกี
- เติร์กเมนิสถาน
- ภาษายูเครน
- ภาษาอูรดู
- อุยกูร์
- อุซเบก
- เวียตนาม
- ภาษาเวลส์
- ช่วย
- ภาษายิดดิช
- โยรูบา
- ซูลู
เม.ย. . 23, 2023 18:54 กลับไปที่รายการ
วิธีการติดตั้ง Chain Link Fence
ก่อนเริ่ม
ค้นหาว่าคุณจำเป็นต้องได้รับใบอนุญาตก่อสร้างและแบ่งเขตหรือไม่
รั้วของคุณจะเป็นไปตามข้อ จำกัด ของโฉนดที่ดินหรือไม่
สร้างบรรทัดคุณสมบัติ
มีสาธารณูปโภคใต้ดินของคุณอยู่ (เดิมพันสีน้ำเงิน)
If you are having your fence installed by someone, are they covered by Workman’s Compensations Insurance?
เครื่องมือที่มีประโยชน์สำหรับการติดตั้งรั้วลิงค์โซ่
สายวัด
ระดับ
คีม
คีมตัดลวด
ค้อนเลื่อน
เสาขุดหลุม
รถสาลี่ พลั่ว และจอบเพื่อผสมและขนส่งคอนกรีต
เลื่อยตัดโลหะหรือเครื่องตัดท่อ
สตริง / เมสันไลน์และสเตค
ประแจวงเดือน
เปลหามรั้ว (อาจใช้แรงดึงประเภทวงล้อ บล็อกและรอก หรืออุปกรณ์ที่คล้ายกัน เครื่องมือขึงลวดส่วนใหญ่สามารถยืมหรือเช่าในท้องถิ่นได้)
|
วัสดุที่จำเป็นสำหรับรั้ว Link Chain ที่อยู่อาศัย |
|||
|
คำอธิบาย |
รูปภาพ |
ปริมาณการใช้ |
ปริมาณที่จะซื้อ |
|
ผ้ารั้ว |
 |
ปกติขายเป็นม้วนๆละ 50 ฟุต |
|
|
รถไฟยอดนิยม |
 |
ฟุตเทจทั้งหมดของรั้วที่ไม่มีช่องเปิดประตู |
|
|
โพสต์บรรทัด (โพสต์กลาง) |
 |
หารฟุตเทจทั้งหมดด้วย 10 และปัดเศษขึ้น (ดูแผนภูมิด้านล่าง) |
|
|
เสาเทอร์มินอล (ปลายเสา มุม และเสาประตู) (โดยปกติจะมีขนาดใหญ่กว่าเสาบรรทัด) |
 |
ตามความต้องการ (2 สำหรับแต่ละประตู) |
|
|
ปลอกรางด้านบน |
 |
1 สำหรับแต่ละความยาวของรางบนธรรมดา ไม่จำเป็นสำหรับรางเลื่อนด้านบน |
|
|
หมวกห่วง |
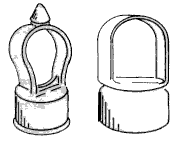 |
ใช้โพสต์บรรทัดละ 1 โพสต์ (แสดงสองรูปแบบทางซ้าย) |
|
|
บาร์แรงดึง |
 |
ใช้ 1 สำหรับปลายแต่ละด้านหรือเสาประตู 2 สำหรับแต่ละเสามุม |
|
|
วงรั้ง |
 |
ใช้ 1 อันต่อแถบปรับความตึง (ยึดปลายรางให้เข้าที่) |
|
|
ปลายราง |
 |
ใช้ 1 ต่อแถบความตึง |
|
|
แถบความตึงเครียด |
 |
ใช้ 4 แท่งต่อแถบแรงดึงหรือ 1 แท่งต่อความสูงของรั้ว |
|
|
โบลท์แคร่ 5/16" x 1 1/4" |
 |
ใช้ 1 ต่อแรงดึงหรือสายรัด |
|
|
โพสต์แคปชั่น |
 |
ใช้ 1 สำหรับโพสต์เทอร์มินัลแต่ละรายการ |
|
|
รั้วผูก / ผูกตะขอ |
 |
1 ตัวสำหรับทุกๆ 12 นิ้วของเสาบรรทัด และ 1 ตัวสำหรับทุกๆ 24 นิ้วของรางด้านบน |
|
|
ประตูทางเดิน |
 |
|
|
|
ประตูไดรฟ์คู่ |
 |
|
|
|
บานพับชาย / บานพับเสา |
 |
2 ต่อ single walk gate และ 4 ต่อ double drive gate |
|
|
โบลท์แคร่ 3/8" x 3" |
 |
1 ต่อบานพับชาย |
|
|
บานพับหญิง / บานพับประตู |
 |
2 ต่อ single walk gate และ 4 ต่อ double drive gate |
|
|
แคร่โบลท์ 3/8" x 1 3/4" |
 |
1 ต่อบานพับหญิง |
|
|
สลักส้อม |
 |
ประตูละ 1 ประตู |
|
ขั้นตอนที่ 1 - สำรวจเส้นคุณสมบัติ
ตรวจสอบให้แน่ใจว่ารั้วไม่เกินแนวทรัพย์สิน ผู้ติดตั้งรั้วส่วนใหญ่แนะนำให้ตั้งเสาทั้งหมดประมาณ 4 นิ้วภายในเส้นคุณสมบัติ ซึ่งจะช่วยหลีกเลี่ยงการรุกล้ำพื้นที่ที่อยู่ติดกันด้วยฐานคอนกรีต ทำได้ง่าย ๆ โดยการขึงเชือกตามแนวคุณสมบัติและตั้งเสา 4 นิ้วไว้ข้างใน
Step 2 - Locate and set Terminal Posts (corner, end, and gate posts are called terminal posts)
ระยะห่างระหว่างเสาประตูกำหนดโดยการเพิ่มความกว้างจริงของประตูบวกค่าเผื่อบานพับและสลัก โดยปกติแล้วประตูแบบเดินต้องใช้ 3 3/4" สำหรับบานพับและสลัก และประตูแบบขับคู่ต้องใช้ 5 1/2" ถัดไปขุดหลุม
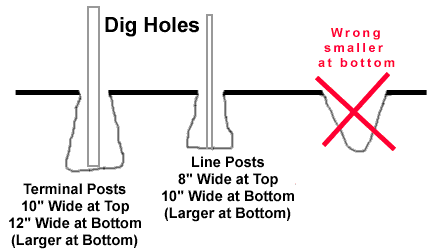
เสาเทอร์มินอลควรตั้งให้สูงกว่าความสูงของรั้วผ้า 2 นิ้ว และเสาไลน์ต่ำกว่าความสูงของรั้วแฟบริค 2 นิ้ว (เสาเทอร์มินอลควรสูงกว่าเสาไลน์ 4 นิ้ว) ตั้งเสาเทอร์มินอลในคอนกรีตโดยใช้ ส่วนผสมคอนกรีต คุณสามารถใช้ซีเมนต์ 1 ส่วน ทราย 2 ส่วน และกรวด 4 ส่วน นอกจากนี้ยังมีซีเมนต์ผสมล่วงหน้า ใช้ระดับเพื่อให้แน่ใจว่าเสาตรง เสาควรอยู่กึ่งกลางในหลุม ฐานรากเสามงกุฎ น้ำจะไหลออกจากเสา
ขั้นตอนที่ 3 - ค้นหาและตั้งค่าการโพสต์ของ Line
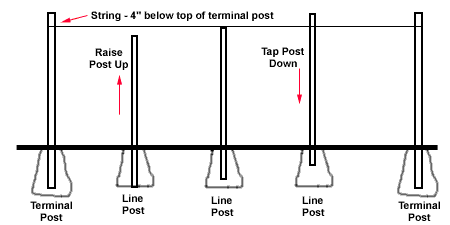
After the concrete around the terminal posts have hardened, stretch a string tight between the terminal posts. The string should be 4" below the top of the terminal posts. Line posts should not be spaced more than 10 feet apart. For example, if the length between two terminal posts is 30 feet, then line posts would be spaced 10 feet apart (see chart below). ig the post holes and set the line posts. Before concrete begins to set, adjust post height by moving post up or down. Top of the line posts should be even with the string. Check with level to make sure posts are straight.
ขั้นตอนที่ 4 - ใช้ฟิตติ้งกับเสาเทอร์มินอล
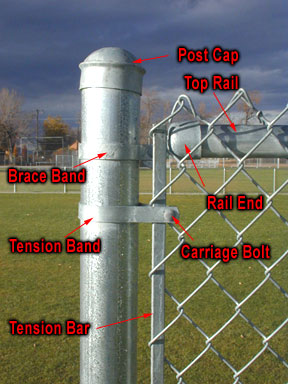
ตรวจสอบรายการวัสดุและแผนผังอุปกรณ์ด้านบน หลังจากติดตั้งเสาทั้งหมดและฐานคอนกรีตแข็งตัวแล้ว ให้เลื่อนสายรัดและสายรัดยึดเข้ากับเสาขั้วต่อ พื้นผิวเรียบยาวของสายรัดควรหันไปทางด้านนอกของรั้ว ระวังอย่าให้อุปกรณ์กระจายหรือบิดเบี้ยว ตอนนี้ใช้ตัวพิมพ์ใหญ่โพสต์เทอร์มินัล
ขั้นตอนที่ 5 - ใช้ Top Rail
แนบลูปแคปกับโพสต์ในบรรทัด สอดท่อรางบนยาวหนึ่งเส้นผ่านตาบนที่ใกล้กับเสาเทอร์มินอลตัวใดตัวหนึ่งมากที่สุด เลื่อนปลายรางไปที่ส่วนท้ายของรางด้านบนและติดเข้ากับเสาปลายรางโดยใช้แถบรั้ง (หากใช้รางด้านบนแบบกด ห้ามสอดปลายรางเลื่อนเข้าไปในปลายราง) ยึดปลายรางเข้ากับสายรัดด้วยโบลต์แคร่ ดำเนินการต่อโดยติดรางด้านบนเข้าด้วยกัน หากไม่ได้ใช้รางบนแบบพับ คุณจะต่อปลายรางเข้าด้วยกันโดยใช้ปลอกรางบน เมื่อไปถึงเสาเทอร์มินอลอีกอัน ให้วัดอย่างระมัดระวังและตัดรางด้านบนให้พอดีกับปลายราง ยึดปลายรางเข้ากับเสาเทอร์มินอลด้วยแถบรั้งและโบลต์แคร่
ขั้นตอนที่ 6 - Hang Chain Link Fabric
คลี่ผ้าเชื่อมโยงโซ่บนพื้นตามแนวรั้ว เลื่อนแถบความตึงผ่านข้อต่อสุดท้ายบนผ้าเชื่อมโยงโซ่ ยืนผ้าขึ้นและวางกับเสา ยึดแถบปรับความตึง (ที่คุณเพิ่งใส่เข้าไป) เข้ากับเสาขั้วต่อด้วยแถบปรับความตึง (ที่อยู่บนเสาแล้ว) ใช้สลักเกลียวแคร่กับหัวไปที่ด้านนอกของรั้ว เดินไปตามรั้วและดึงกางเกงออก ติดผ้าเข้ากับรางด้านบนอย่างหลวมๆ โดยใช้ลวดผูกไม่กี่เส้น
To connect two sections or rolls of fence fabric together - take a single strand of wire from one of the sections of fence (Sometimes it is necessary to remove a second wire on the one end in order for the two sections to mesh properly.). Place the two section of fence next to each other (end on end). Join the two sections by winding (corkscrew fashion) the loose strand down through the fence. Join and tighten the knuckles at bottom and top. Now you shouldn't even be able to see where the two sections were connection together.
To remove excess chain link fence fabric - untie both top and bottom ends of fence (knuckles - pliers shown below). Twist the wire in a corkscrew fashion until the fence comes apart. One picket shown in red is turned until the fence is separated.
ขั้นตอนที่ 7 - ผ้าเชื่อมโยงโซ่ยืด
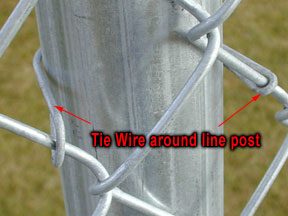
ควรผูกผ้าไว้ที่ปลายอีกด้านของรั้วแล้ว สอดแถบปรับความตึง (อาจต้องเสริม) ประมาณ 3 ฟุตภายในปลายผ้าที่ไม่ได้ติด ยึดปลายด้านหนึ่งของเปลรั้วเข้ากับแถบปรับความตึงและปลายอีกด้านหนึ่งเข้ากับเสาเทอร์มินอลให้แน่น ยืดผ้า - ความตึงที่ถูกต้องควรให้ปริมาณเล็กน้อยเมื่อบีบด้วยมือ ด้านบนของผ้าควรอยู่เหนือราวด้านบนประมาณ 1/2 นิ้ว ปรับผ้าให้ได้ความยาวที่แน่นอนโดยเพิ่มหรือถอดลวดตามที่กล่าวไว้ในขั้นตอนที่ 6 ใส่แถบปรับความตึงที่ส่วนท้ายของผ้าและต่อแถบปรับความตึงที่เสาขั้วต่อ . ถอดเปลรั้ว ติดลวดสลิงที่ราวด้านบนห่างกัน 24 นิ้ว ติดลวดผูกเข้ากับเสาห่างกัน 12 นิ้ว ขันน็อตให้แน่นที่สายรัดและสายรัดทั้งหมด
ขั้นตอนที่ 8 - ประตูแขวน
หลังจากทำรั้วเสร็จแล้ว ให้ติดตั้งบานพับตัวผู้เข้ากับเสาประตูบานหนึ่ง แขวนบานพับด้านบนโดยให้หมุดชี้ลง และบานพับด้านล่างโดยให้หมุดชี้ขึ้น สิ่งนี้จะป้องกันไม่ให้ประตูถูกยกออก ตั้งประตูให้เข้าที่โดยให้ด้านบนของประตูตรงกับด้านบนของรั้ว ปรับและขันบานพับเพื่อให้สามารถแกว่งได้เต็มที่ ติดตั้งกลอนประตูสำหรับประตูบานเดี่ยว ประตูบานคู่ใช้ขั้นตอนเดียวกันแต่ติดตั้งอุปกรณ์สลักตรงกลาง (สลักส้อม)
Notes: Post depth can be determined by local weather and soil conditions, terminal posts are normally dug 10" wide and 18" to 30" deep. Depending on the wind and soil conditions you may want to use 8' centers or even a more narrow spacing for line posts. You may want to use longer line or terminal posts depending on the wind and soil conditions in your area. If you want to add privacy slats in the future, make sure the frame work will be strong enough for additional wind load.
Orange barrier fencing mesh is an extruded polypropylene plastic mesh fencing for cordoning off building sites, construction sites, sporting event areas and for general crowd and pedestrian control. Orange barrier fencing mesh is UV stabilised and a bright high visablity orange colour for maximum warning.
We offer various grades/weights of orange safty mesh fence.
Our light grade (110g/m²) and Medium grade (140g/m²) are stretched during the extrusion process to give them a very high tensile strength making them very robust for harsh building sites. Our heavy grade barrier mesh fencing (200g/m²) is unstretched and provides a far more visual orange fence.
|
แบบอย่าง |
the rectangular hole |
the oval hole |
|||||
|
Mesh size(mm) |
70X40 |
90x26 |
100x26 |
100X40 |
65X35 |
70X40 |
80X65 |
|
น้ำหนัก |
80-400 g/m2 can be customized. |
||||||
|
Roll Width(m) |
1ม.,1.2ม.,1.22ม.,1.5ม.,1.8ม |
||||||
|
Roll Length(m) |
20-50-100m can be customized |
||||||
|
สี |
orange, yellow, green,blue etc. |
||||||
แอพพลิเคชั่น
§ Temporary fencing where an area needs to be cordonned off
§ Cordoning off construction sites / building sites
§ Temporary plastic fence for crowd control
คุณสมบัติ
§ Lightweight and fast to install
§ UV Stabilised plastic mesh
§ High visibility orange mesh colour
§ Reusable - easily installed, easy to roll up and use again


