- アフリカ
- アルバニア語
- アムハラ語
- アラビア語
- アルメニア語
- アゼルバイジャン語
- バスク語
- ベラルーシ語
- ベンガル語
- ボスニア語
- ブルガリア語
- カタロニア語
- セブアノ
- 中国
- 中国(台湾)
- コルシカ島
- クロアチア語
- チェコ語
- デンマーク語
- オランダの
- 英語
- エスペラント
- エストニア語
- フィンランド語
- フランス語
- フリジア語
- ガリシア語
- ジョージア語
- ドイツ人
- ギリシャ語
- グジャラート語
- ハイチのクレオール語
- ハウサ
- ハワイアン
- ヘブライ語
- いいえ
- ミャオ族
- ハンガリー語
- アイスランド語
- イボ
- インドネシア語
- アイリッシュ
- イタリアの
- 日本
- ジャワ語
- カンナダ語
- カザフ語
- クメール語
- ルワンダ
- 韓国語
- クルド
- キルギス
- 労働
- ラテン
- ラトビア語
- リトアニア語
- ルクセンブルク語
- マケドニアの
- マルガシ
- マレー語
- マラヤーラム語
- マルタ語
- マオリ語
- マラーティー語
- モンゴル語
- ミャンマー
- ネパール語
- ノルウェー語
- ノルウェー語
- オック語
- パシュトー語
- ペルシア語
- 研磨
- ポルトガル語
- パンジャブ語
- ルーマニア語
- ロシア
- サモア語
- スコットランド・ゲール語
- セルビア語
- 英語
- ショナ
- シンド語
- シンハラ語
- スロバキア語
- スロベニア語
- ソマリ語
- スペイン語
- スンダ語
- スワヒリ語
- スウェーデンの
- タガログ語
- タジク語
- タミル語
- タタール語
- テルグ語
- タイ語
- トルコ語
- トルクメン人
- ウクライナ語
- ウルドゥー語
- ウイグル語
- ウズベク語
- ベトナム語
- ウェールズ語
- ヘルプ
- イディッシュ語
- ヨルバ
- ズールー語
4月 . 23, 2023 18:54 リストに戻る
金網フェンスの取り付け方法
始める前に
建築許可とゾーニング許可を取得する必要があるかどうかを調べます。
あなたのフェンスは近隣の証書の制限を満たしていますか.
敷地境界線を設定します。
地下ユーティリティを配置します。 (ブルーステーク)
If you are having your fence installed by someone, are they covered by Workman’s Compensations Insurance?
金網フェンスの設置に便利な工具
巻尺
レベル
ペンチ
ワイヤーカッター
大型ハンマー、大槌
ポストホールディガー
コンクリートを混ぜて運ぶための手押し車、シャベル、鍬
弓のこまたはパイプカッター
ストリング / メイソンラインとステークス
クレセントレンチ
フェンスストレッチャー(ラチェットタイプのパワープル、ブロックアンドタックル、または類似の装置を使用できます。ほとんどのワイヤーストレッチツールは借りるか、地元で借りることができます。)
|
住宅の金網フェンスに必要な材料 |
|||
|
説明 |
写真 |
使用量 |
購入する数量 |
|
フェンス生地 |
 |
通常、50フィートのロールで販売されています |
|
|
トップレール |
 |
ゲート開口部を除いたフェンスの総映像 |
|
|
ラインポスト(中間ポスト) |
 |
合計フッテージを 10 で割り、切り上げます (下の表を参照)。 |
|
|
ターミナル ポスト (エンド ポスト、コーナー ポスト、ゲート ポスト) (通常はライン ポストよりも大きい) |
 |
必要に応じて (ゲートごとに 2 つ) |
|
|
トップレールスリーブ |
 |
プレーントップレールの長さごとに 1 つ。スウェッジトップレールには不要 |
|
|
ループキャップ |
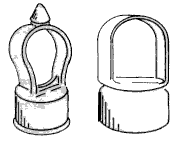 |
投稿ごとに 1 つ使用します (左側に 2 つのスタイルが表示されています)。 |
|
|
テンションバー |
 |
各エンドまたはゲート ポストに 1 つ、各コーナー ポストに 2 つ使用します。 |
|
|
ブレースバンド |
 |
テンション バーごとに 1 つ使用します (レールの端を所定の位置に保持します)。 |
|
|
レールエンド |
 |
テンションバー1本につき1本使用 |
|
|
テンションバンド |
 |
テンション バーごとに 4 つ、またはフェンスの高さ 1 フィートごとに 1 つ使用します。 |
|
|
キャリッジボルト 5/16" x 1 1/4" |
 |
テンションまたはブレース バンドごとに 1 つ使用します。 |
|
|
ポストキャップ |
 |
各端子ポストに 1 つ使用 |
|
|
フェンスタイ/フックタイ |
 |
ライン ポストの 12 インチごとに 1 つ、トップ レールの 24 インチごとに 1 つ |
|
|
ウォークゲート |
 |
|
|
|
ダブルドライブゲート |
 |
|
|
|
おす蝶番・ポスト蝶番 |
 |
シングル ウォーク ゲートあたり 2 つ、ダブル ドライブ ゲートあたり 4 つ |
|
|
キャリッジボルト 3/8" x 3" |
 |
雄型ヒンジごとに 1 個 |
|
|
めす蝶番・門扉蝶番 |
 |
シングル ウォーク ゲートあたり 2 つ、ダブル ドライブ ゲートあたり 4 つ |
|
|
キャリッジボルト 3/8" x 1 3/4" |
 |
雌ヒンジあたり 1 個 |
|
|
フォークラッチ |
 |
ウォーク ゲートごとに 1 つ |
|
ステップ 1 - 測量敷地境界線
フェンスが敷地境界線を超えないようにしてください。ほとんどのフェンス設置者は、すべての支柱を敷地境界線の約 4 インチ内側に設定することを推奨しています。これにより、隣接する敷地にコンクリートの基礎が侵入するのを防ぐことができます。
Step 2 - Locate and set Terminal Posts (corner, end, and gate posts are called terminal posts)
ゲート ポスト間の距離は、ゲートの実際の幅にヒンジとラッチの許容値を加算して決定されます。通常、ウォーク ゲートにはヒンジとラッチ用に 3 3/4 インチが必要で、ダブル ドライブ ゲートには 5 1/2 インチが必要です。次に穴を掘ります。
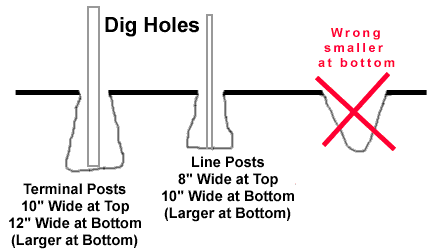
ターミナル ポストはフェンス ファブリックの高さより 2 インチ高く、ライン ポストはフェンス ファブリックの高さより 2 インチ低く設定する必要があります (ターミナル ポストはライン ポストより 4 インチ高くする必要があります)。コンクリートミックス. セメント1部、砂2部、砂利4部を使用できます. プレミックスセメントもあります. レベルを使用して、ポストがまっすぐであることを確認します. ポストは穴の中央に配置する必要があります.水はポストから排出されます。
ステップ 3 - ライン ポストを見つけて設定する
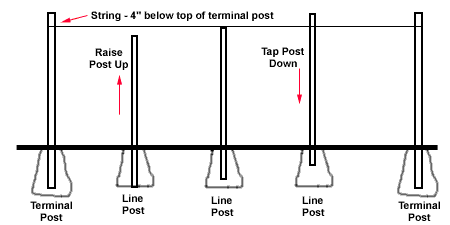
After the concrete around the terminal posts have hardened, stretch a string tight between the terminal posts. The string should be 4" below the top of the terminal posts. Line posts should not be spaced more than 10 feet apart. For example, if the length between two terminal posts is 30 feet, then line posts would be spaced 10 feet apart (see chart below). ig the post holes and set the line posts. Before concrete begins to set, adjust post height by moving post up or down. Top of the line posts should be even with the string. Check with level to make sure posts are straight.
ステップ 4 - フィッティングを端子ポストに適用する
上記の素材リストとフィッティングチャートを確認してください。すべてのポストが設置され、コンクリートの基礎が硬化したら、テンション バンドとブレース バンドをターミナル ポストに滑り込ませます。テンションバンドの長い平らな面がフェンスの外側に向くようにします。フィッティングを広げたり歪めたりしないように注意してください。ターミナル ポスト キャップを適用します。
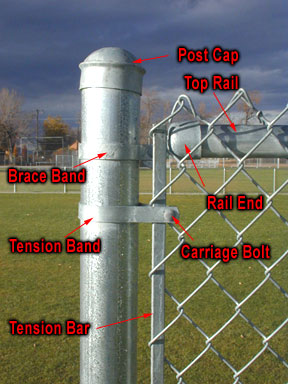
ステップ 5 - トップレールを適用する
ライン ポストにループ キャップを取り付けます。ターミナル ポストの 1 つに最も近いアイトップを通して、トップ レール パイプの 1 つの長さを挿入します。レールの端をトップ レールの端にスライドさせ、ブレース バンドを使用してターミナル ポストに取り付けます (スエッジ トップ レールを使用する場合は、スウェッジ エンドをレール エンドに挿入しないでください)。レール エンドをキャリッジ ボルトでブレース バンドに固定します。トップレールを一緒に取り付けることによって続けます。スウェッジ トップ レールを使用しない場合は、トップ レール スリーブを使用してレールの両端を接続します。もう一方の端子ポストに到達したら、慎重に測定し、上部レールを切断してレールの端にしっかりとはめ込みます。ブレース バンドとキャリッジ ボルトを使用して、レールの端をターミナル ポストに固定します。
ステップ 6 - チェーン リンク ファブリを吊るすc
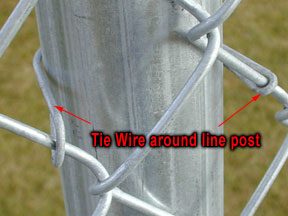
フェンスラインに沿ってチェーンリンクファブリックを地面に広げます。テンション バーをチェーン リンク ファブリックの最後のリンクに通します。生地を立てて、支柱に当てます。テンション バー (挿入したばかり) をテンション バンド (既にポストに付いている) でターミナル ポストに固定します。キャリッジボルトは頭がフェンスの外側になるように使用してください。柵に沿って歩き、たるみをとります。ワイヤータイを数本使ってファブリックをトップレールにゆるく取り付けます。
To connect two sections or rolls of fence fabric together - take a single strand of wire from one of the sections of fence (Sometimes it is necessary to remove a second wire on the one end in order for the two sections to mesh properly.). Place the two section of fence next to each other (end on end). Join the two sections by winding (corkscrew fashion) the loose strand down through the fence. Join and tighten the knuckles at bottom and top. Now you shouldn't even be able to see where the two sections were connection together.
To remove excess chain link fence fabric - untie both top and bottom ends of fence (knuckles - pliers shown below). Twist the wire in a corkscrew fashion until the fence comes apart. One picket shown in red is turned until the fence is separated.
ステップ 7 - ストレッチ チェーン リンク ファブリック
生地はフェンスの反対側の端にすでに固定されているはずです。テンション バー (余分な 1 つが必要な場合があります) を布の取り付けられていない端の約 3 フィート内側に挿入します。フェンス ストレッチャーの一方の端をテンション バーに、もう一方の端をターミナル ポストにしっかりと固定します。生地を伸ばします - 正しい張力は、手で絞ったときにわずかなギブを許容する必要があります.ファブリックの上部は、トップ レールの約 1/2 インチ上に配置する必要があります。ステップ 6 で説明したように、ワイヤを追加または削除してファブリックを正確な長さに調整します。ファブリックの端にテンション バーを挿入し、ターミナル ポストにテンション バンドを接続します。 . フェンス ストレッチャーを取り外します. ワイヤー タイをトップ レールに 24 インチ離して取り付けます.ワイヤー タイを 12 インチ離してポストに取り付けます。すべてのブレースとテンション バンドのナットを締めます。
ステップ 8 - ハンギング ゲート
フェンスが完成したら、オス ヒンジをゲート ポストの 1 つに取り付けます。上部のヒンジはピンを下に向け、下部のヒンジはピンを上に向けて吊り下げます。これにより、ゲートが持ち上げられるのを防ぎます。ゲートの上部をフェンスの上部に合わせて、ゲートを所定の位置に設定します。ヒンジを調整して締め、フルスイングできるようにします。シングルゲート用のゲートラッチを取り付けます。ダブル ゲートも同じ手順を使用しますが、センター ラッチ デバイス (フォーク ラッチ) を取り付けます。
Notes: Post depth can be determined by local weather and soil conditions, terminal posts are normally dug 10" wide and 18" to 30" deep. Depending on the wind and soil conditions you may want to use 8' centers or even a more narrow spacing for line posts. You may want to use longer line or terminal posts depending on the wind and soil conditions in your area. If you want to add privacy slats in the future, make sure the frame work will be strong enough for additional wind load.
Orange barrier fencing mesh is an extruded polypropylene plastic mesh fencing for cordoning off building sites, construction sites, sporting event areas and for general crowd and pedestrian control. Orange barrier fencing mesh is UV stabilised and a bright high visablity orange colour for maximum warning.
We offer various grades/weights of orange safty mesh fence.
Our light grade (110g/m²) and Medium grade (140g/m²) are stretched during the extrusion process to give them a very high tensile strength making them very robust for harsh building sites. Our heavy grade barrier mesh fencing (200g/m²) is unstretched and provides a far more visual orange fence.
|
モデル |
the rectangular hole |
the oval hole |
|||||
|
Mesh size(mm) |
70X40 |
90x26 |
100x26 |
100X40 |
65X35 |
70X40 |
80X65 |
|
重さ |
80-400 g/m2 can be customized. |
||||||
|
Roll Width(m) |
1m、1.2m、1.22m、1.5m、1.8m |
||||||
|
Roll Length(m) |
20-50-100m can be customized |
||||||
|
色 |
orange, yellow, green,blue etc. |
||||||
アプリケーション
§ Temporary fencing where an area needs to be cordonned off
§ Cordoning off construction sites / building sites
§ Temporary plastic fence for crowd control
特徴
§ Lightweight and fast to install
§ UV Stabilised plastic mesh
§ High visibility orange mesh colour
§ Reusable - easily installed, easy to roll up and use again


