- ອາຟຣິກາ
- ອານບານີ
- Amharic
- ອາຣັບ
- ອາເມເນຍ
- ອາເຊີໄບຈັນ
- Basque
- ເບລາຣຸດ
- ເບັງກາລີ
- ໂບສເນຍ
- ບຸນກາຣີ
- ຄາຕາລານ
- ເຊບູອາໂນ
- ຈີນ
- ຈີນ (ໄຕ້ຫວັນ)
- Corsican
- ໂຄຣເອເຊຍ
- ເຊັກ
- ເດັນມາກ
- ໂຮນລັງ
- ພາສາອັງກິດ
- ເອສເປີຣັນໂຕ
- ເອສໂຕເນຍ
- ຟິນແລນ
- ພາສາຝຣັ່ງ
- Frisian
- ກາລິຊຽນ
- ຈໍເຈຍ
- ເຢຍລະມັນ
- ກຣີກ
- ກູຈາຣາຕີ
- ເຮຕີ ຄຣີໂອ
- ໂຮຊາ
- ຮາວາຍ
- ເຮັບເຣີ
- ບໍ່
- ມວຍ
- ຮັງກາຣີ
- ໄອສແລນຕິກ
- ອິກໂບ
- ອິນໂດເນເຊຍ
- ໄອແລນ
- ອິຕາລຽນ
- ພາສາຍີ່ປຸ່ນ
- ພາສາ Javanese
- ແຄນນາດາ
- ຄາຊັກ
- ຂະເໝນ
- ຣູວັນດາ
- ເກົາຫຼີ
- ຊາວເຄີດ
- ພາສາກີສ
- ແຮງງານ
- ລາຕິນ
- ລັດເວຍ
- ລິທົວເນຍ
- Luxembourgish
- ມາເຊໂດເນຍ
- ມາລກາຊິ
- ມາເລ
- ມາລາຢາລາມ
- Maltese
- Maori
- Marathi
- ມົງໂກລີ
- ມຽນມາ
- ເນປານ
- ນໍເວ
- ນໍເວ
- ໂອຊິຕັນ
- ພາສໂຕ
- ເປີເຊຍ
- ໂປໂລຍ
- ພາສາປອກຕຸຍການ
- ປັນຈາບີ
- ໂຣມາເນຍ
- ພາສາລັດເຊຍ
- ຊາມົວ
- Scottish Gaelic
- ເຊີເບຍ
- ພາສາອັງກິດ
- ໂຊນາ
- ຊິນດີ
- Sinhala
- ສະໂລວັກ
- ສະໂລເວເນຍ
- ໂຊມາລີ
- ແອສປາໂຍນ
- ຊູດານ
- ສະວາຮິລີ
- ຊູແອັດ
- ພາສາຕາກາລັອກ
- ທາຈິກ
- ທະມິນ
- ທາຕາ
- ເຕລູກູ
- ໄທ
- ຕວກກີ
- ເຕີກເມັນ
- ອູແກຣນ
- ອູດູ
- ອູຍເກີ
- ອຸສເບກ
- ຫວຽດນາມ
- ເວນ
- ຊ່ວຍເຫຼືອ
- ຍິດ
- ໂຢຣູບາ
- ຊູລູ
ມ.ສ. . 23, 2023 18:54 ກັບໄປທີ່ລາຍຊື່
ວິທີການຕິດຕັ້ງຮົ້ວ Link Chain
ກ່ອນທີ່ຈະເລີ່ມຕົ້ນ
ຊອກຫາວ່າເຈົ້າຈໍາເປັນຕ້ອງໄດ້ຮັບໃບອະນຸຍາດກໍ່ສ້າງແລະເຂດ.
ຮົ້ວຂອງເຈົ້າຈະຕອບສະຫນອງຂໍ້ຈໍາກັດຂອງບ້ານ.
ສ້າງຕັ້ງສາຍຊັບສິນ.
ມີເຄື່ອງໃຊ້ໄຟຟ້າໃຕ້ດິນຂອງເຈົ້າຕັ້ງຢູ່. (ສະເຕກສີຟ້າ)
If you are having your fence installed by someone, are they covered by Workman’s Compensations Insurance?
ເຄື່ອງມືທີ່ເປັນປະໂຫຍດສໍາລັບການຕິດຕັ້ງຮົ້ວເຊື່ອມຕໍ່ລະບົບຕ່ອງໂສ້
ເທບວັດແທກ
ລະດັບ
ເຂັມ
ເຄື່ອງຕັດສາຍໄຟ
Sledge Hammer
Post Hole Digger
Wheelbarrow, Shovel ແລະ Hoe ເພື່ອປະສົມແລະຂົນສົ່ງຄອນກີດ
Hacksaw ຫຼືເຄື່ອງຕັດທໍ່
String / Mason Line ແລະສະເຕກ
Crescent Wrench
ເຄື່ອງຍືດຮົ້ວ (ອາດຈະໄດ້ຮັບການນຳໃຊ້ເຄື່ອງດຶງໄຟ, ຕັນ ແລະຕັ່ງ, ຫຼືອຸປະກອນທີ່ຄ້າຍຄືກັນ. ເຄື່ອງຍືດສາຍສ່ວນໃຫຍ່ສາມາດຢືມໄດ້ ຫຼືໃຫ້ເຊົ່າໃນທ້ອງຖິ່ນ).
|
ວັດສະດຸທີ່ຕ້ອງການສໍາລັບຮົ້ວເຊື່ອມຕໍ່ລະບົບຕ່ອງໂສ້ທີ່ຢູ່ອາໄສ |
|||
|
ລາຍລະອຽດ |
ຮູບ |
ປະລິມານທີ່ຈະໃຊ້ |
ປະລິມານທີ່ຈະຊື້ |
|
ຜ້າຮົ້ວ |
 |
ປົກກະຕິແລ້ວຂາຍໃນມ້ວນ 50 ຟຸດ |
|
|
ທາງລົດໄຟເທິງ |
 |
ວິດີໂອທັງໝົດຂອງຮົ້ວເປີດປະຕູໜ້ອຍລົງ |
|
|
ໂພສແຖວ (ຂໍ້ຄວາມລະດັບປານກາງ) |
 |
ແບ່ງ footage ທັງຫມົດໂດຍ 10 ແລະຮອບຂຶ້ນ (ເບິ່ງຕາຕະລາງຂ້າງລຸ່ມນີ້) |
|
|
ໄປສະນີຢູ່ປາຍຍອດ (ປາຍ, ແຈ, ແລະເສົາປະຕູ) (ປົກກະຕິແລ້ວໃຫຍ່ກວ່າເສົາແຖວ) |
 |
ຕາມຄວາມຕ້ອງການ (2 ສໍາລັບແຕ່ລະປະຕູ) |
|
|
ເສອແຂນທາງລົດໄຟເທິງ |
 |
1 ສໍາລັບແຕ່ລະຄວາມຍາວຂອງທາງລົດໄຟເທິງທໍາມະດາ. ບໍ່ຈໍາເປັນສໍາລັບລົດໄຟເທິງ swedged |
|
|
Loop Caps |
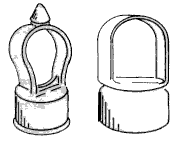 |
ໃຊ້ 1 ຕໍ່ແຖວໂພສ (ສອງແບບສະແດງໄວ້ທາງຊ້າຍ) |
|
|
ແຖບຄວາມເຄັ່ງຕຶງ |
 |
ໃຊ້ 1 ສໍາລັບແຕ່ລະປາຍຫຼືປະຕູຮົ້ວ, 2 ສໍາລັບແຕ່ລະມຸມ |
|
|
ສາຍແຂນ |
 |
ໃຊ້ 1 ຕໍ່ແຖບຄວາມເຄັ່ງຕຶງ (ຖືປາຍລາງລົດໄຟຢູ່ບ່ອນ) |
|
|
ລາງລົດໄຟ |
 |
ໃຊ້ 1 ຕໍ່ແຖບຄວາມກົດດັນ |
|
|
ແຖບຄວາມເຄັ່ງຕຶງ |
 |
ໃຊ້ 4 ຕໍ່ແຖບຄວາມກົດດັນຫຼື 1 ຕໍ່ຕີນຂອງຄວາມສູງຂອງຮົ້ວ |
|
|
ບານປະຕູ 5/16" x 1 1/4" |
 |
ໃຊ້ 1 ຕໍ່ຄວາມກົດດັນຫຼືແຖບ brace |
|
|
Post Cap |
 |
ໃຊ້ 1 ສໍາລັບແຕ່ລະ terminal post |
|
|
ຮົ້ວ Tie / Hook Ties |
 |
1 ສໍາລັບທຸກໆ 12" ຂອງແຖວແລະ 1 ສໍາລັບທຸກໆ 24" ຂອງລົດໄຟເທິງ |
|
|
ປະຕູຍ່າງ |
 |
|
|
|
Double Drive Gate |
 |
|
|
|
ປະຕູຮົ້ວຊາຍ / Post Hinge |
 |
2 ຕໍ່ປະຕູຍ່າງດຽວ ແລະ 4 ຕໍ່ປະຕູໄດສອງເທົ່າ |
|
|
ປະຕູລົດ 3/8" x 3" |
 |
1 ຕໍ່ hinge ຊາຍ |
|
|
Hinge ຍິງ / ປະຕູຮົ້ວ |
 |
2 ຕໍ່ປະຕູຍ່າງດຽວ ແລະ 4 ຕໍ່ປະຕູໄດສອງເທົ່າ |
|
|
ປະຕູລົດ 3/8" x 1 3/4" |
 |
1 ຕໍ່ hinge ຍິງ |
|
|
ສ້ອມສ້ອມ |
 |
1 ຕໍ່ປະຕູຍ່າງ |
|
ຂັ້ນຕອນທີ 1 - ການສໍາຫຼວດສາຍຊັບສິນ
ໃຫ້ແນ່ໃຈວ່າຮົ້ວບໍ່ເກີນເສັ້ນຊັບສິນ. ຜູ້ຕິດຕັ້ງຮົ້ວສ່ວນໃຫຍ່ແນະນໍາໃຫ້ຕັ້ງເສົາທັງຫມົດປະມານ 4" ພາຍໃນເສັ້ນຊັບສິນ, ນີ້ຈະຊ່ວຍຫຼີກເວັ້ນການບຸກລຸກຊັບສິນທີ່ຢູ່ຕິດກັນດ້ວຍຕີນຊີມັງ. ນີ້ສາມາດເຮັດໄດ້ງ່າຍໂດຍການຍືດສາຍຕາມເສັ້ນຊັບສິນແລະກໍານົດ 4" ພາຍໃນ.
Step 2 - Locate and set Terminal Posts (corner, end, and gate posts are called terminal posts)
ໄລຍະຫ່າງລະຫວ່າງເສົາປະຕູແມ່ນຖືກກໍານົດໂດຍການເພີ່ມຄວາມກວ້າງຕົວຈິງຂອງປະຕູບວກກັບເງິນອຸດໜູນສໍາລັບ hinges ແລະ latches. ປົກກະຕິແລ້ວປະຕູຍ່າງຕ້ອງການ 3 3/4 "ສໍາລັບ hinges ແລະ latches ແລະປະຕູໄດ double ຕ້ອງການ 5 1/2". ຕໍ່ໄປ, ຂຸດຂຸມ.
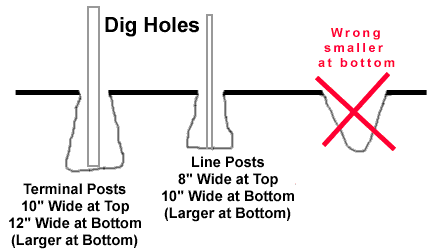
ເສົາຫຼັກຄວນຕັ້ງໃຫ້ສູງກ່ວາຄວາມສູງຂອງຜ້າຮົ້ວ 2" ແລະ ເສົາສາຍ 2" ຕ່ຳກວ່າຄວາມສູງຂອງຜ້າຮົ້ວ 2" (ເສົາຫຼັກຄວນສູງກວ່າເສົາເສັ້ນ 4"). ການປະສົມຊີມັງ, ທ່ານສາມາດນໍາໃຊ້ຊີມັງ 1 ສ່ວນ, ດິນຊາຍ 2 ສ່ວນ, ແລະຫີນກາວ 4 ສ່ວນ, ນອກຈາກນີ້ຍັງມີຊີມັງທີ່ປະສົມກ່ອນ, ໃຊ້ລະດັບເພື່ອເຮັດໃຫ້ເສົາຕັ້ງຊື່, ເສົາຄວນຕັ້ງຢູ່ໃນຂຸມ. ນ້ໍາຈະໄຫຼອອກຈາກເສົາ.
ຂັ້ນຕອນທີ 3 - ຊອກຫາແລະກໍານົດ Line Posts
After the concrete around the terminal posts have hardened, stretch a string tight between the terminal posts. The string should be 4" below the top of the terminal posts. Line posts should not be spaced more than 10 feet apart. For example, if the length between two terminal posts is 30 feet, then line posts would be spaced 10 feet apart (see chart below). ig the post holes and set the line posts. Before concrete begins to set, adjust post height by moving post up or down. Top of the line posts should be even with the string. Check with level to make sure posts are straight.
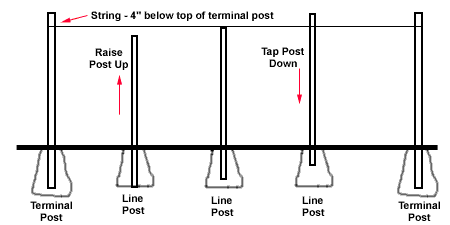
ຂັ້ນຕອນທີ 4 - ນໍາໃຊ້ Fittings ກັບ Terminal Posts
ກວດເບິ່ງລາຍການວັດສະດຸແລະຕາຕະລາງອຸປະກອນຂ້າງເທິງ. ຫຼັງຈາກເສົາທັງໝົດໄດ້ຖືກຕິດຕັ້ງແລ້ວ ແລະ ຕີນຊີມັງໄດ້ແຂງຕົວແລ້ວ, ໃຫ້ເລື່ອນຄວາມຕຶງຄຽດ ແລະ ເຊືອກຜູກໃສ່ກັບເສົາໄຟຟ້າ. ພື້ນຜິວຮາບພຽງຍາວຂອງແຖບຄວາມກົດດັນຄວນປະເຊີນກັບດ້ານນອກຂອງຮົ້ວ. ລະວັງບໍ່ໃຫ້ແຜ່ລາມ ຫຼືບິດເບືອນອຸປະກອນເສີມ. ຕອນນີ້ນຳໃຊ້ໜ້າປົກໄປສະນີຢູ່ປາຍຍອດ.
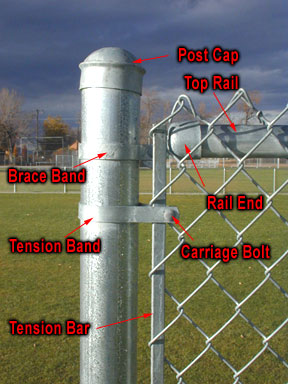
ຂັ້ນຕອນທີ 5 - ນໍາໃຊ້ທາງລົດໄຟເທິງ
ແນບຕົວໝວກໃສ່ແຖວແຖວ. ສຽບທໍ່ລາງລົດໄຟເທິງໜຶ່ງເສັ້ນຍາວຜ່ານຕາເທິງທີ່ໃກ້ທີ່ສຸດກັບໜຶ່ງໃນເສົາປາຍທາງ. ເລື່ອນປາຍລາງລົດໄຟໃສ່ທ້າຍຂອງລາງລົດໄຟເທິງສຸດ ແລະຕິດມັນໃສ່ກັບເສົາ termianl ໂດຍໃຊ້ແຖບ brace (ຖ້າໃຊ້ swedge top rail, ຢ່າໃສ່ປາຍ swedged ເຂົ້າໄປໃນທ້າຍລົດໄຟ). ຍຶດທ້າຍທາງລົດໄຟກັບແຖບເຊືອກຜູກດ້ວຍສາຍປະຕູລົດ. ສືບຕໍ່ໂດຍການຕິດສາຍທາງເທິງເຂົ້າກັນ. ຖ້າລົດໄຟເທິງ swedged ບໍ່ໄດ້ຖືກນໍາໃຊ້, ທ່ານຈະເຊື່ອມຕໍ່ທາງລົດໄຟສິ້ນສຸດລົງຮ່ວມກັນໂດຍໃຊ້ແຂນລົດໄຟເທິງ. ເມື່ອໄປຮອດບ່ອນຈອດລົດອື່ນ, ໃຫ້ວັດແທກຢ່າງລະມັດລະວັງ ແລະຕັດທາງລົດໄຟເທິງສຸດໃຫ້ພໍດີກັບທ້າຍລົດໄຟ. ວາງທາງລົດໄຟທີ່ປອດໄພໄປຫາເສົາປາຍທາງດ້ວຍແຖບເຊືອກຜູກ ແລະສາຍປະຕູລົດ.
ຂັ້ນຕອນທີ 6 - Hang Chain Link Fabric
ຖອດຜ້າເຊື່ອມຕໍ່ຕ່ອງໂສ້ໃສ່ພື້ນດິນຕາມເສັ້ນຮົ້ວ. ແຖບຄວາມກົດດັນເລື່ອນຜ່ານການເຊື່ອມຕໍ່ສຸດທ້າຍກ່ຽວກັບຜ້າເຊື່ອມຕໍ່ຕ່ອງໂສ້. ຢືນຜ້າຂຶ້ນແລະວາງມັນກັບຕໍາແຫນ່ງ. ຍຶດແຖບຄວາມຕຶງຄຽດ (ທີ່ເຈົ້າຫາກໍ່ໃສ່) ໃສ່ກັບເສົາສັນຍານດ້ວຍແຖບຄວາມຕຶງຄຽດ (ມີຢູ່ແລ້ວ). ໃຊ້ປະຕູລົດກັບຫົວໄປທາງນອກຂອງຮົ້ວ. ຍ່າງໄປຕາມຮົ້ວແລະເອົາ slack ອອກ. ມັດຜ້າວ່າງໃສ່ກັບລາງລົດໄຟເທິງດ້ວຍສາຍເຊືອກບາງໆ.
To connect two sections or rolls of fence fabric together - take a single strand of wire from one of the sections of fence (Sometimes it is necessary to remove a second wire on the one end in order for the two sections to mesh properly.). Place the two section of fence next to each other (end on end). Join the two sections by winding (corkscrew fashion) the loose strand down through the fence. Join and tighten the knuckles at bottom and top. Now you shouldn't even be able to see where the two sections were connection together.
To remove excess chain link fence fabric - untie both top and bottom ends of fence (knuckles - pliers shown below). Twist the wire in a corkscrew fashion until the fence comes apart. One picket shown in red is turned until the fence is separated.
ຂັ້ນຕອນທີ 7 - Stretch Chain Link Fabric
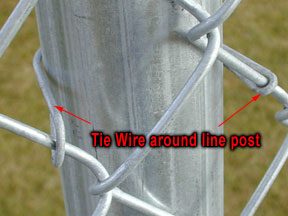
ຜ້າຄວນຈະຖືກມັດໄວ້ຢູ່ປາຍກົງກັນຂ້າມຂອງຮົ້ວ. ສຽບແຖບຄວາມຕຶງຄຽດ (ອາດຈະຕ້ອງການອັນພິເສດ) ປະມານ 3 ຟຸດ ພາຍໃນສິ້ນທີ່ບໍ່ໄດ້ຕິດຢູ່ຂອງຜ້າ. ມັດສົ້ນໜຶ່ງຂອງສາຍຮັດຮົ້ວຢ່າງປອດໄພໃສ່ກັບແຖບຄວາມຕຶງຄຽດ ແລະອີກສົ້ນໜຶ່ງໃສ່ເສົາຫຼັກ. ຍືດຜ້າ - ຄວາມເຄັ່ງຕຶງທີ່ຖືກຕ້ອງຄວນອະນຸຍາດໃຫ້ມີຈໍານວນເລັກນ້ອຍໃນເວລາທີ່ບີບດ້ວຍມື. ດ້ານເທິງຂອງຜ້າຄວນຈະຕັ້ງຢູ່ປະມານ 1/2" ຂ້າງເທິງທາງລົດໄຟເທິງ. ປັບຜ້າໃຫ້ມີຄວາມຍາວທີ່ແນ່ນອນໂດຍການເພີ່ມຫຼືຖອດສາຍຕາມທີ່ໄດ້ກ່າວໄວ້ໃນຂັ້ນຕອນ 6. ໃສ່ແຖບຄວາມເຄັ່ງຕຶງຢູ່ປາຍຂອງຜ້າແລະເຊື່ອມຕໍ່ແຖບຄວາມເຄັ່ງຕຶງເທິງເສົາ. ຖອດສາຍຮັດຮົ້ວອອກ. ແນບສາຍເຊືອກໃສ່ທາງລົດໄຟເທິງຫ່າງກັນ 24 ນິ້ວ. ແນບສາຍເຊືອກໃສ່ເສົາທີ່ຫ່າງກັນ 12 ນິ້ວ. ຮັດແກ່ນໝາກໄມ້ໃສ່ທຸກສາຍຍຶດ ແລະແຖບຄວາມຕຶງຄຽດ.
ຂັ້ນຕອນທີ 8 - Hanging Gates
ຫຼັງຈາກຮົ້ວໄດ້ສ້າງສຳເລັດແລ້ວ, ຈົ່ງຕິດຕັ້ງຮົ້ວຊາຍໃສ່ເສົາປະຕູອັນໜຶ່ງ, ແຂວນປະຕູທາງເທິງດ້ວຍເຂັມຊີ້ລົງລຸ່ມ ແລະ ຮູລຸ່ມມີເຂັມຊີ້ຂຶ້ນ. ນີ້ຈະປ້ອງກັນບໍ່ໃຫ້ປະຕູຖືກຍົກອອກ. ຕັ້ງປະຕູໃຫ້ຢູ່ບ່ອນ, ວາງທາງເທິງຂອງປະຕູກັບທາງເທິງຂອງຮົ້ວ. ປັບແລະຮັດ hinges ໃຫ້ສໍາລັບການ swing ເຕັມ. ຕິດຕັ້ງປະຕູຮົ້ວສໍາລັບປະຕູດຽວ. ປະຕູຄູ່ໃຊ້ຂັ້ນຕອນດຽວກັນແຕ່ຕິດຕັ້ງອຸປະກອນ latching ສູນກາງ (ສ້ອມສ້ອມ).
Notes: Post depth can be determined by local weather and soil conditions, terminal posts are normally dug 10" wide and 18" to 30" deep. Depending on the wind and soil conditions you may want to use 8' centers or even a more narrow spacing for line posts. You may want to use longer line or terminal posts depending on the wind and soil conditions in your area. If you want to add privacy slats in the future, make sure the frame work will be strong enough for additional wind load.
Orange barrier fencing mesh is an extruded polypropylene plastic mesh fencing for cordoning off building sites, construction sites, sporting event areas and for general crowd and pedestrian control. Orange barrier fencing mesh is UV stabilised and a bright high visablity orange colour for maximum warning.
We offer various grades/weights of orange safty mesh fence.
Our light grade (110g/m²) and Medium grade (140g/m²) are stretched during the extrusion process to give them a very high tensile strength making them very robust for harsh building sites. Our heavy grade barrier mesh fencing (200g/m²) is unstretched and provides a far more visual orange fence.
|
ຕົວແບບ |
the rectangular hole |
the oval hole |
|||||
|
Mesh size(mm) |
70X40 |
90x26 |
100x26 |
100X40 |
65X35 |
70X40 |
80X65 |
|
ນ້ຳໜັກ |
80-400 g/m2 can be customized. |
||||||
|
Roll Width(m) |
1m,1.2m,1.22m,1.5m,1.8m |
||||||
|
Roll Length(m) |
20-50-100m can be customized |
||||||
|
ສີ |
orange, yellow, green,blue etc. |
||||||
ຄໍາຮ້ອງສະຫມັກ
§ Temporary fencing where an area needs to be cordonned off
§ Cordoning off construction sites / building sites
§ Temporary plastic fence for crowd control
ຄຸນລັກສະນະ
§ Lightweight and fast to install
§ UV Stabilised plastic mesh
§ High visibility orange mesh colour
§ Reusable - easily installed, easy to roll up and use again


