- આફ્રિકન
- અલ્બેનિયન
- એમ્હારિક
- અરબી
- આર્મેનિયન
- અઝરબૈજાની
- બાસ્ક
- બેલારુસિયન
- બંગાળી
- બોસ્નિયન
- બલ્ગેરિયન
- કતલાન
- સેબુઆનો
- ચીન
- ચીન (તાઇવાન)
- કોર્સિકન
- ક્રોએશિયન
- ચેક
- ડેનિશ
- ડચ
- અંગ્રેજી
- એસ્પેરાન્ટો
- એસ્ટોનિયન
- ફિનિશ
- ફ્રેન્ચ
- ફ્રિશિયન
- ગેલિશિયન
- જ્યોર્જિયન
- જર્મન
- ગ્રીક
- ગુજરાતી
- હૈતીયન ક્રેઓલ
- હૌસા
- હવાઇયન
- હીબ્રુ
- ના
- મિયાઓ
- હંગેરિયન
- આઇસલેન્ડિક
- igbo
- ઇન્ડોનેશિયન
- આઇરિશ
- ઇટાલિયન
- જાપાનીઝ
- જાવાનીસ
- કન્નડ
- કઝાક
- ખ્મેર
- રવાન્ડન
- કોરિયન
- કુર્દિશ
- કિર્ગીઝ
- શ્રમ
- લેટિન
- લાતવિયન
- લિથુનિયન
- લક્ઝમબર્ગિશ
- મેસેડોનિયન
- માલગાશી
- મલય
- મલયાલમ
- માલ્ટિઝ
- માઓરી
- મરાઠી
- મોંગોલિયન
- મ્યાનમાર
- નેપાળી
- નોર્વેજીયન
- નોર્વેજીયન
- ઓક્સિટન
- પશ્તો
- ફારસી
- પોલિશ
- પોર્ટુગીઝ
- પંજાબી
- રોમાનિયન
- રશિયન
- સમોઅન
- સ્કોટિશ ગેલિક
- સર્બિયન
- અંગ્રેજી
- શોના
- સિંધી
- સિંહલા
- સ્લોવાક
- સ્લોવેનિયન
- સોમાલી
- સ્પૅનિશ
- સુન્ડનીઝ
- સ્વાહિલી
- સ્વીડિશ
- ટાગાલોગ
- તાજિક
- તમિલ
- તતાર
- તેલુગુ
- થાઈ
- ટર્કિશ
- તુર્કમેન
- યુક્રેનિયન
- ઉર્દુ
- ઉઇગુર
- ઉઝબેક
- વિયેતનામીસ
- વેલ્શ
- મદદ
- યિદ્દિશ
- યોરૂબા
- ઝુલુ
એપ્રિલ . 23, 2023 18:54 યાદી પર પાછા
સાંકળ લિંક વાડ કેવી રીતે ઇન્સ્ટોલ કરવી
શરૂ કરતા પહેલા
તમારે બિલ્ડિંગ અને ઝોનિંગ પરમિટ મેળવવાની જરૂર છે કે કેમ તે શોધો.
શું તમારી વાડ પડોશી ખત પ્રતિબંધોને પૂર્ણ કરશે.
મિલકત રેખાઓ સ્થાપિત કરો.
તમારી ભૂગર્ભ ઉપયોગિતાઓ સ્થિત કરો. (બ્લુ સ્ટેક્ડ)
If you are having your fence installed by someone, are they covered by Workman’s Compensations Insurance?
સાંકળ લિંક વાડ સ્થાપિત કરવા માટે ઉપયોગી સાધનો
ટેપ માપ
સ્તર
પેઇર
વાયર કટર
સ્લેજ હેમર
પોસ્ટ હોલ ડિગર
વ્હીલબેરો, પાવડો અને કોંક્રીટને મિક્સ કરવા અને પરિવહન કરવા માટે
હેક્સો અથવા પાઇપ કટર
સ્ટ્રિંગ / મેસન લાઇન અને સ્ટેક્સ
અર્ધચંદ્રાકાર રેન્ચ
ફેન્સ સ્ટ્રેચર (રેચેટ પ્રકારના પાવર પુલ, બ્લોક અને ટેકલ અથવા સમાન ઉપકરણનો ઉપયોગ કરી શકાય છે. મોટાભાગના વાયર સ્ટ્રેચિંગ ટૂલ્સ ઉધાર અથવા સ્થાનિક રીતે ભાડે આપી શકાય છે.)
|
રહેણાંક સાંકળ લિંક વાડ માટે જરૂરી સામગ્રી |
|||
|
વર્ણન |
ચિત્ર |
ઉપયોગ કરવા માટે જથ્થો |
ખરીદવાનો જથ્થો |
|
વાડ ફેબ્રિક |
 |
સામાન્ય રીતે 50 ફૂટના રોલમાં વેચાય છે |
|
|
ટોચની રેલ |
 |
વાડથી ઓછા દરવાજા ખોલવાના કુલ ફૂટેજ |
|
|
લાઇન પોસ્ટ્સ (મધ્યવર્તી પોસ્ટ્સ) |
 |
કુલ ફૂટેજને 10 વડે વિભાજીત કરો અને રાઉન્ડ અપ કરો (નીચેનો ચાર્ટ જુઓ) |
|
|
ટર્મિનલ પોસ્ટ્સ (એન્ડ, કોર્નર અને ગેટ પોસ્ટ્સ) (સામાન્ય રીતે લાઇન પોસ્ટ્સ કરતાં મોટી) |
 |
જરૂરિયાત મુજબ (દરેક ગેટ માટે 2) |
|
|
ટોચની રેલ સ્લીવ |
 |
પ્લેન ટોપ રેલની દરેક લંબાઈ માટે 1. સ્વેજ્ડ ટોપ રેલ માટે જરૂરી નથી |
|
|
લૂપ કેપ્સ |
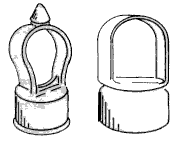 |
લાઇન પોસ્ટ દીઠ 1 નો ઉપયોગ કરો (બે શૈલી ડાબે બતાવેલ છે) |
|
|
ટેન્શન બાર |
 |
દરેક છેડા અથવા ગેટ પોસ્ટ માટે 1, દરેક ખૂણે પોસ્ટ માટે 2 નો ઉપયોગ કરો |
|
|
બ્રેસ બેન્ડ |
 |
ટેન્શન બાર દીઠ 1 નો ઉપયોગ કરો (રેલ છેડાને સ્થાને રાખે છે) |
|
|
રેલ સમાપ્ત |
 |
ટેન્શન બાર દીઠ 1 નો ઉપયોગ કરો |
|
|
ટેન્શન બેન્ડ |
 |
ટેન્શન બાર દીઠ 4 અથવા વાડની ઊંચાઈ દીઠ 1 ફૂટનો ઉપયોગ કરો |
|
|
કેરેજ બોલ્ટ્સ 5/16" x 1 1/4" |
 |
ટેન્શન અથવા બ્રેસ બેન્ડ દીઠ 1 નો ઉપયોગ કરો |
|
|
પોસ્ટ કેપ |
 |
દરેક ટર્મિનલ પોસ્ટ માટે 1 નો ઉપયોગ કરો |
|
|
વાડ ટાઈ / હૂક સંબંધો |
 |
દરેક 12" લાઇન પોસ્ટ માટે 1 અને ટોચની રેલના દરેક 24" માટે 1 |
|
|
વૉક ગેટ |
 |
|
|
|
ડબલ ડ્રાઇવ ગેટ |
 |
|
|
|
પુરુષ મિજાગરું / પોસ્ટ મિજાગરું |
 |
સિંગલ વૉક ગેટ દીઠ 2 અને ડબલ ડ્રાઇવ ગેટ દીઠ 4 |
|
|
કેરેજ બોલ્ટ્સ 3/8" x 3" |
 |
પુરૂષ હિન્જ દીઠ 1 |
|
|
સ્ત્રી હિન્જ / ગેટ હિન્જ |
 |
સિંગલ વૉક ગેટ દીઠ 2 અને ડબલ ડ્રાઇવ ગેટ દીઠ 4 |
|
|
કેરેજ બોલ્ટ 3/8" x 1 3/4" |
 |
સ્ત્રી હિન્જ દીઠ 1 |
|
|
ફોર્ક લેચ |
 |
1 વોક ગેટ દીઠ |
|
પગલું 1 - સર્વે પ્રોપર્ટી લાઇન
ખાતરી કરો કે વાડ મિલકત રેખાઓ કરતાં વધી નથી. મોટાભાગના વાડ સ્થાપકો ભલામણ કરે છે કે તમામ પોસ્ટ્સ પ્રોપર્ટી લાઇનની અંદર આશરે 4" સેટ કરવામાં આવે. આ કોંક્રિટ ફૂટિંગ્સ સાથે સંલગ્ન મિલકત પર અતિક્રમણ ટાળવામાં મદદ કરશે. પ્રોપર્ટી લાઇન સાથે સ્ટ્રિંગને ખેંચીને અને પોસ્ટ્સ 4" અંદર સેટ કરીને આ સરળતાથી થઈ શકે છે.
Step 2 - Locate and set Terminal Posts (corner, end, and gate posts are called terminal posts)
ગેટ પોસ્ટ્સ વચ્ચેનું અંતર ગેટની વાસ્તવિક પહોળાઈ ઉપરાંત હિન્જ્સ અને લૅચ માટે ભથ્થું ઉમેરીને નક્કી કરવામાં આવે છે. સામાન્ય રીતે વૉક ગેટને હિન્જ્સ અને લૅચ માટે 3 3/4" અને ડબલ ડ્રાઇવ ગેટ માટે 5 1/2"ની જરૂર પડે છે. આગળ, છિદ્રો ખોદવો.
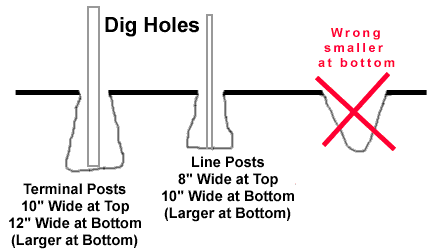
ટર્મિનલ પોસ્ટ્સ વાડ ફેબ્રિકની ઊંચાઈ કરતાં 2" ઊંચી અને લાઇન પોસ્ટ્સ 2" ફેન્સ ફેબ્રિકની ઊંચાઈ કરતાં ઓછી હોવી જોઈએ (ટર્મિનલ પોસ્ટ્સ લાઇન પોસ્ટ્સ કરતાં 4" ઊંચી હોવી જોઈએ). કોંક્રિટ મિશ્રણ. તમે 1 ભાગ સિમેન્ટ, 2 ભાગ રેતી અને 4 ભાગ કાંકરીનો ઉપયોગ કરી શકો છો. ત્યાં પ્રી-મિક્સ સિમેન્ટ પણ છે. પોસ્ટ્સ સીધી છે તેની ખાતરી કરવા માટે એક સ્તરનો ઉપયોગ કરો. પોસ્ટ્સ છિદ્રમાં કેન્દ્રિત હોવી જોઈએ. ક્રાઉન પોસ્ટ ફૂટિંગ્સ જેથી પાણી પોસ્ટ્સમાંથી દૂર થઈ જશે.
પગલું 3 - લાઇન પોસ્ટ્સ શોધો અને સેટ કરો
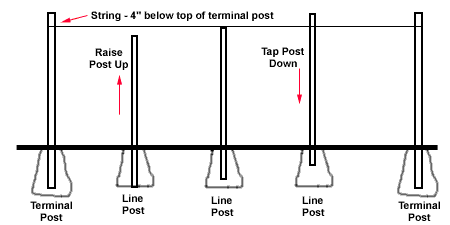
After the concrete around the terminal posts have hardened, stretch a string tight between the terminal posts. The string should be 4" below the top of the terminal posts. Line posts should not be spaced more than 10 feet apart. For example, if the length between two terminal posts is 30 feet, then line posts would be spaced 10 feet apart (see chart below). ig the post holes and set the line posts. Before concrete begins to set, adjust post height by moving post up or down. Top of the line posts should be even with the string. Check with level to make sure posts are straight.
પગલું 4 - ટર્મિનલ પોસ્ટ્સ પર ફિટિંગ લાગુ કરો
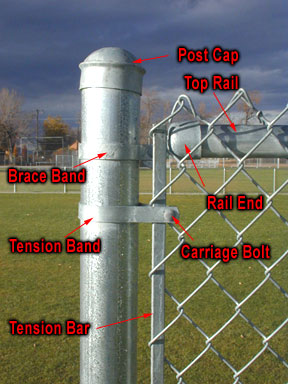
ઉપરોક્ત સામગ્રીની સૂચિ અને ફિટિંગ ચાર્ટ તપાસો. બધી પોસ્ટ્સ ઇન્સ્ટોલ થઈ ગયા પછી અને કોંક્રીટના પાયા સખત થઈ ગયા પછી, ટર્મિનલ પોસ્ટ્સ પર ટેન્શન અને બ્રેસ બેન્ડને સરકી દો. ટેન્શન બેન્ડની લાંબી સપાટ સપાટી વાડની બહારની તરફ હોવી જોઈએ. ફીટીંગ્સ ફેલાવો અથવા વિકૃત ન થાય તેની કાળજી લો. હવે ટર્મિનલ પોસ્ટ કેપ્સ લાગુ કરો.
પગલું 5 - ટોપ રેલ લાગુ કરો
લાઇન પોસ્ટ્સ પર લૂપ કેપ્સ જોડો. ટર્મિનલ પોસ્ટમાંથી એકની સૌથી નજીકની આંખની ટોચ દ્વારા ટોચની રેલ પાઇપની એક લંબાઈ દાખલ કરો. ટોચની રેલના છેડા પર રેલના છેડાને સ્લાઇડ કરો અને બ્રેસ બેન્ડનો ઉપયોગ કરીને તેને ટર્મિયનલ પોસ્ટ સાથે જોડો (જો સ્વીજ ટોપ રેલનો ઉપયોગ કરો છો, તો સ્વીજ કરેલા છેડાને રેલના છેડામાં દાખલ કરશો નહીં). કેરેજ બોલ્ટ વડે બ્રેસ બેન્ડના રેલ છેડાને સુરક્ષિત કરો. ટોચની રેલ્સને એકસાથે જોડીને ચાલુ રાખો. જો સ્વેજ્ડ ટોપ રેલનો ઉપયોગ ન કરવામાં આવ્યો હોય, તો તમે ટોપ રેલ સ્લીવનો ઉપયોગ કરીને રેલના છેડાને એકસાથે જોડશો. અન્ય ટર્મિનલ પોસ્ટ પર પહોંચ્યા પછી, કાળજીપૂર્વક માપો અને રેલના છેડામાં ચુસ્તપણે ફિટ થવા માટે ટોચની રેલને કાપો. બ્રેસ બેન્ડ અને કેરેજ બોલ્ટ સાથે ટર્મિનલ પોસ્ટ સુધી સુરક્ષિત રેલ છેડે.
પગલું 6 - હેંગ ચેઇન લિંક ફેબ્રિc
વાડ લાઇન સાથે જમીન પર સાંકળ લિંક ફેબ્રિકને અનરોલ કરો. ચેઇન લિંક ફેબ્રિક પરની છેલ્લી લિંક દ્વારા ટેન્શન બારને સ્લાઇડ કરો. ફેબ્રિકને ઉભા કરો અને તેને પોસ્ટ્સની સામે મૂકો. ટેન્શન બેન્ડ્સ (પોસ્ટ પર પહેલેથી જ છે) સાથે ટર્મિનલ પોસ્ટ પર ટેન્શન બાર (જે તમે હમણાં જ દાખલ કર્યું છે) જોડો. વાડની બહારના ભાગમાં માથા સાથે કેરેજ બોલ્ટનો ઉપયોગ કરો. વાડ સાથે ચાલો અને સ્લેકને બહાર કાઢો. થોડા વાયર ટાઈ સાથે ટોચની રેલ સાથે ઢીલી રીતે ફેબ્રિક જોડો.
To connect two sections or rolls of fence fabric together - take a single strand of wire from one of the sections of fence (Sometimes it is necessary to remove a second wire on the one end in order for the two sections to mesh properly.). Place the two section of fence next to each other (end on end). Join the two sections by winding (corkscrew fashion) the loose strand down through the fence. Join and tighten the knuckles at bottom and top. Now you shouldn't even be able to see where the two sections were connection together.
To remove excess chain link fence fabric - untie both top and bottom ends of fence (knuckles - pliers shown below). Twist the wire in a corkscrew fashion until the fence comes apart. One picket shown in red is turned until the fence is separated.
પગલું 7 - સ્ટ્રેચ ચેઇન લિંક ફેબ્રિક
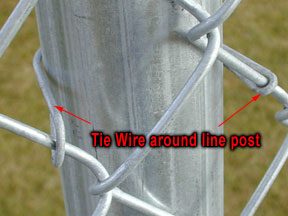
ફેબ્રિક પહેલાથી જ વાડના વિરુદ્ધ છેડે બાંધેલું હોવું જોઈએ. ફેબ્રિકના અનટેચ કરેલ છેડાની અંદર આશરે 3 ફીટ અંદર ટેન્શન બાર દાખલ કરો (એક વધારાની જરૂર પડી શકે છે). વાડ સ્ટ્રેચરના એક છેડાને ટેન્શન બાર અને બીજા છેડાને ટર્મિનલ પોસ્ટ પર સુરક્ષિત રીતે જોડો. ફેબ્રિકને સ્ટ્રેચ કરો - જ્યારે હાથ વડે સ્ક્વિઝ કરવામાં આવે ત્યારે યોગ્ય તાણમાં થોડી માત્રામાં આપવા જોઈએ. ફેબ્રિકની ટોચ ઉપરની રેલની ઉપર લગભગ 1/2" સ્થિત હોવી જોઈએ. સ્ટેપ 6 માં જણાવ્યા મુજબ વાયર ઉમેરીને અથવા દૂર કરીને ફેબ્રિકને ચોક્કસ લંબાઈમાં સમાયોજિત કરો. ફેબ્રિકના અંતમાં ટેન્શન બાર દાખલ કરો અને ટર્મિનલ પોસ્ટ પર ટેન્શન બેન્ડ્સ જોડો. . વાડ સ્ટ્રેચર દૂર કરો. ટોચની રેલ સાથે 24" સિવાય વાયર જોડાણો જોડો. 12"ના અંતરે પોસ્ટ્સ સાથે વાયર ટાઈ જોડો. તમામ કૌંસ અને ટેન્શન બેન્ડ્સ પર નટ્સ કડક કરો.
પગલું 8 - હેંગિંગ ગેટ્સ
વાડ પૂર્ણ થઈ ગયા પછી, ગેટ પોસ્ટ્સમાંથી એક પર પુરૂષ હિન્જ્સ ઇન્સ્ટોલ કરો, ટોચની મિજાગરીને નીચે તરફ નિર્દેશ કરતી પિન સાથે લટકાવો અને પિન ઉપર તરફ નિર્દેશિત કરીને નીચેનો હિન્જ લટકાવો. આ ગેટને ઉપાડવાથી અટકાવશે. ગેટની ટોચને વાડની ટોચ સાથે સંરેખિત કરીને, ગેટને સ્થાને સેટ કરો. સંપૂર્ણ સ્વિંગ માટે પરવાનગી આપવા માટે હિન્જ્સને સમાયોજિત કરો અને સજ્જડ કરો. સિંગલ ગેટ માટે ગેટ લેચ ઇન્સ્ટોલ કરો. ડબલ ગેટ સમાન પ્રક્રિયાનો ઉપયોગ કરે છે પરંતુ સેન્ટર લેચિંગ ડિવાઇસ (ફોર્ક લેચ) ઇન્સ્ટોલ કરે છે.
Notes: Post depth can be determined by local weather and soil conditions, terminal posts are normally dug 10" wide and 18" to 30" deep. Depending on the wind and soil conditions you may want to use 8' centers or even a more narrow spacing for line posts. You may want to use longer line or terminal posts depending on the wind and soil conditions in your area. If you want to add privacy slats in the future, make sure the frame work will be strong enough for additional wind load.
Orange barrier fencing mesh is an extruded polypropylene plastic mesh fencing for cordoning off building sites, construction sites, sporting event areas and for general crowd and pedestrian control. Orange barrier fencing mesh is UV stabilised and a bright high visablity orange colour for maximum warning.
We offer various grades/weights of orange safty mesh fence.
Our light grade (110g/m²) and Medium grade (140g/m²) are stretched during the extrusion process to give them a very high tensile strength making them very robust for harsh building sites. Our heavy grade barrier mesh fencing (200g/m²) is unstretched and provides a far more visual orange fence.
|
મોડલ |
the rectangular hole |
the oval hole |
|||||
|
Mesh size(mm) |
70X40 |
90x26 |
100x26 |
100X40 |
65X35 |
70X40 |
80X65 |
|
વજન |
80-400 g/m2 can be customized. |
||||||
|
Roll Width(m) |
1m,1.2m,1.22m,1.5m,1.8m |
||||||
|
Roll Length(m) |
20-50-100m can be customized |
||||||
|
રંગ |
orange, yellow, green,blue etc. |
||||||
અરજીઓ
§ Temporary fencing where an area needs to be cordonned off
§ Cordoning off construction sites / building sites
§ Temporary plastic fence for crowd control
વિશેષતા
§ Lightweight and fast to install
§ UV Stabilised plastic mesh
§ High visibility orange mesh colour
§ Reusable - easily installed, easy to roll up and use again


