- African
- Albanian
- Aethiopica
- Arabice
- Armenian
- Azerbaijani
- Basque
- Belarusian
- Bengalica
- Bosnian
- Bulgarica
- Catalan
- Cebuano
- China
- China (Taiwan)
- Corsica
- Croatian
- Czech
- Danica
- Batavica
- Anglicus
- Esperanto
- Estonian
- Finnicum
- Gallica
- Frisian
- Gallician
- Georgian
- German
- Graeca
- Gujarati
- Haitian Creole
- hausa
- hawaiian
- hebraice
- non
- Miao
- Hungarica
- Islandic
- igbo
- Indonesiaca
- hibernica
- Italian
- Iaponica
- Javanese
- Kannada
- kazakh
- Khmer
- Rwandan
- Coreanica
- Kurdish
- Kyrgyz
- Laboris
- Latinus
- Latvian
- Lithuanian
- Luxemburgish
- macedonicum
- Malgashi
- Malay
- Malayalam
- Melitensis
- Maori
- Marathi
- Mongolica
- Myanmar
- Nepalica
- Norvegica
- Norvegica
- Occitan
- Pashto
- Persae
- Polonica
- Portuguese
- Punjabi
- Romanian
- Russian
- Samoanice
- Scotica Gaelic
- Serbian
- Anglicus
- Shona
- Sindhi
- Sinhala
- Moravica
- Slovenian
- Somali
- hispanice
- Sundanese
- Swahili
- Swedish
- Tagalog
- Tajik
- Tamil
- Tatar
- Telugu
- Thai
- Turcicum
- Turci
- Ucraina
- Urdu
- Uighur
- Uzbek
- Vietnamica
- Cambrica
- Auxilium
- Yiddish
- Ioruba
- Zulu
Apr. 23, 2023 18:54 Ad album
Quomodo install Catenam Link Fence
Antequam Satus
Experiri, si opus est ad aedificationem et zoning permittit.
Tuum sepem dignum vicinia factum restrictiones.
Res lineas funda.
Tuae utilitates sub terra positae sunt. (Blue ius naturale)
If you are having your fence installed by someone, are they covered by Workman’s Compensations Insurance?
Utile instrumenta ad saepem link installing catenae
Tape Mensura
Level
Forcipes
Cutters filum
Hammer tribula
Post foramen Digger
Pabo, Shovel et Hoe miscere et onerariam Concrete
Hacksaw aut Pipe Cutter
String / Mason Line and Pali
Crescens Wrench
Sepes Stretcher (spatiandi genus potentiae viverra, stipes et armamenta, vel similia fabrica adhiberi possunt. Plurima instrumenta extensionis filum mutuari vel localiter locari possunt).
|
Materiae necessariae ad Residential catenam Link Fence |
|||
|
Descriptio |
Picture |
Quantitas ad usus |
Quantitas emere |
|
sepem Fabric |
 |
Plerumque vendidit in rotulis de L pedes |
|
|
Top Rail |
 |
Totalis footage saepes minus foraminibus portae |
|
|
Line Posts (media) |
 |
Divide summa footage per X et circum est (vide chart infra) |
|
|
Postes terminales (postes finis, angulus et porta) (posts linea plerumque maior) |
 |
Postulantibus (II pro unaquaque porta) |
|
|
Top Rail Sleeve |
 |
1 Pro singulis longi- tudine campi iudei. Non requiritur ad scheded vertice blasphemant; |
|
|
loop Caps |
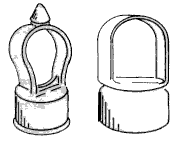 |
Utere I per lineam post (duobus generibus ostensum est left) |
|
|
Contentio Bar |
 |
Uti 1 pro quolibet fine vel porta post, 2 pro quolibet angulo post |
|
|
Brace Band |
 |
Utere I per tensio talea (tenet rail finem in loco) |
|
|
Rail desinit |
 |
Utere I per tensio talea |
|
|
Tension Band |
 |
Uti IV per tensio talea seu I per pedem saepes altitudo |
|
|
Vehiculum Repagula 5/16" x 1 1/4" |
 |
Utere I per tensio vel ue cohortem |
|
|
Post Cap |
 |
Utere I pro singulis terminis post |
|
|
Vinculum sepem / Hook Ties |
 |
1 pro quolibet 12" e stipes lineae et 1 pro singulis 24" e top rail |
|
|
ambula porta |
 |
|
|
|
Duplex Coegi Gate |
 |
|
|
|
Male Hinge / Post Hinge |
 |
2 per singulas deambulatio portas et 4 per duplex coegi porta |
|
|
Vehiculum Bolts 3/8" x 3" |
 |
I per masculum cardine |
|
|
Hinge Male / Gate Hinge |
 |
2 per singulas deambulatio portas et 4 per duplex coegi porta |
|
|
Vehiculum Bolt 3/8" x 1 3/4" |
 |
I per feminam cardine |
|
|
Furca Claustrum |
 |
I per portam deambulatio |
|
Gradus I - Survey Property Linearum
Fac ut saepes lineas possessiones non excedat. Maxime saepes institutores suadent ut omnes stationes circa 4" intra lineam proprietatis ponantur. Hoc adiuvabit ne intrahamus in adiuncta proprietatem cum solidis gradibus. Hoc facile fit per lineam proprietatis tendere et cursores 4" intus ponere.
Step 2 - Locate and set Terminal Posts (corner, end, and gate posts are called terminal posts)
Distantia inter postes portae ipsam portae latitudinem additis additis plus salario cardinis et pessulis. Plerumque portae ambulationes requirunt 3 3/4" pro cardine et pessulis et portae duplices agendae 5 1/2". Deinde effodiunt foramina.
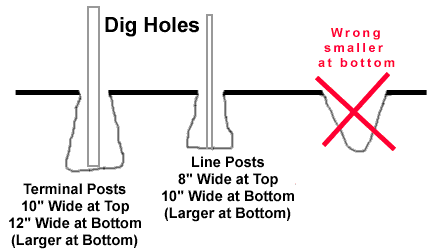
Postes terminales ponendae sunt 2" altior quam altitudo fabricae saepes et lineae 2" inferior quam altitudo fabricae saepes (postes terminales 4 debent esse" altior quam linea postes). Stipes terminales in concreto usus pone. Admisceto concreto, caementa 1 parte, arena 2 partes, et glarea partes 4, Est etiam caementum praemixto, utere gradu ut cursores recta sint. Stipes in foramine sitas. exhauriet aqua e frontibus.
Gradus III - Locate et pone lineam Posts
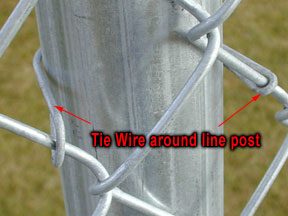
After the concrete around the terminal posts have hardened, stretch a string tight between the terminal posts. The string should be 4" below the top of the terminal posts. Line posts should not be spaced more than 10 feet apart. For example, if the length between two terminal posts is 30 feet, then line posts would be spaced 10 feet apart (see chart below). ig the post holes and set the line posts. Before concrete begins to set, adjust post height by moving post up or down. Top of the line posts should be even with the string. Check with level to make sure posts are straight.
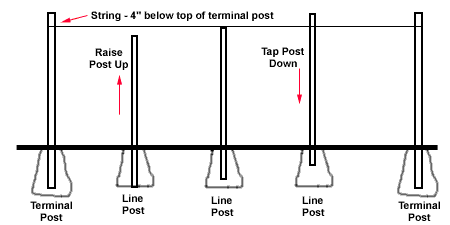
Gradus IV - Applicare congruentiae Terminatio Posts
Perscriptio materiae et instrumentorum chart supra. Postquam omnes stipes inaedificatae sunt et solidae plantae induraverunt, tensio et ligamenta in postes terminales elabuntur. Cohors tensionis longa superficies plana debet tendere ad extra saepem. Cave ne caerimonias divulgare vel distorqueas. Nunc appone pileos post terminales.
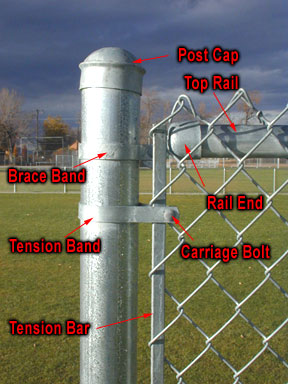
Step V - Applicare Top Rail
Adplicare ansam pilleatorum ad lineam stipes. Unam longi- tudinem capitis fistulae rail per oculum top proximae ad unam postem terminalem inserere. Slide claustrum in finem cacumen cacumen incidere et eum ad terminum cursorem adnectere utendo bracteolae fasciculo (Si swedge top rail utens, finem claui in clausurae noli inserere). Secure clausurae finem ue band cum curru fulmine. Permanere adiunctis summo cancellos simul. Si clausurae cacumen rail non adhibetur, clausuras clausuras in summo manicas plenas adhibebis. Cum ad alterum postem terminalem pervenerit, diligenter metire et cacumen rail secare, ut in finem clausurae arcte aptum sit. Secure rail end to the terminal post with brace band and vehiculum fulmen.
Gradus VI - Vinculum Vinculum Fabric
Detlefsen catena fabricae in terra per lineam saepem. Tensio talea labi per nexum novissimum in nexus nexus vinculo. Surge fabricam et pone contra postes. Liga tensio vectis (ut modo inseritur) ad stationem terminalem cum vinculis tensionis (iam in poste). Clavis vehiculis utere cum capite ad extra saepem. Per sepem ambula et remissam tolle. Fabricam dissolute adnectere ad verticem rail cum paucis nexibus filum.
To connect two sections or rolls of fence fabric together - take a single strand of wire from one of the sections of fence (Sometimes it is necessary to remove a second wire on the one end in order for the two sections to mesh properly.). Place the two section of fence next to each other (end on end). Join the two sections by winding (corkscrew fashion) the loose strand down through the fence. Join and tighten the knuckles at bottom and top. Now you shouldn't even be able to see where the two sections were connection together.
To remove excess chain link fence fabric - untie both top and bottom ends of fence (knuckles - pliers shown below). Twist the wire in a corkscrew fashion until the fence comes apart. One picket shown in red is turned until the fence is separated.
Gradus 7 - Extende Catenam Link Fabric
Iam fabricae adactus est ad extremum saepem. Inserta vectis tensionis (fortasse extra unum) circiter 3 pedes intra finem fabricae solutum. Secure cingulo unum extremum saepimentum ad tensionem vectem et alterum finem ad terminum cursorem. Porrige fabricam - tensio recta permittere debet parvam quantitatem tribuendi cum manu expressam. Summa fabricae collocari debet circiter 1/2" supra culmen clausurae. Fabricae aptare longitudinem addere vel removere filum de quo in pass. . Remove grabatum saepem. Attach filum ties ut summo rail XXIV "seorsum. Filum affigere ligamenta ad nuntia 12" separatim. Obstringere nuces in omnibus bracteis et vinculis tensionis.
Gradus VIII - pensilis portis
Post saepem peractam, unius portae postes cardo masculo institue, summo cardine pensili clavo deorsum monstrante et cardine ima clavo sursum monstrante. Haec porta quominus tollatur prohibebit. Porta pone in loco, aligning top of the gate with the top of fence. Aptare et obstringere cardinibus ad plenum adductius permittit. Portam claustrum inaugurare singulis portis. Eodem modo utuntur portae duplices, sed centrum claudens fabricam instituunt (fork pessulus).
Notes: Post depth can be determined by local weather and soil conditions, terminal posts are normally dug 10" wide and 18" to 30" deep. Depending on the wind and soil conditions you may want to use 8' centers or even a more narrow spacing for line posts. You may want to use longer line or terminal posts depending on the wind and soil conditions in your area. If you want to add privacy slats in the future, make sure the frame work will be strong enough for additional wind load.
Orange barrier fencing mesh is an extruded polypropylene plastic mesh fencing for cordoning off building sites, construction sites, sporting event areas and for general crowd and pedestrian control. Orange barrier fencing mesh is UV stabilised and a bright high visablity orange colour for maximum warning.
We offer various grades/weights of orange safty mesh fence.
Our light grade (110g/m²) and Medium grade (140g/m²) are stretched during the extrusion process to give them a very high tensile strength making them very robust for harsh building sites. Our heavy grade barrier mesh fencing (200g/m²) is unstretched and provides a far more visual orange fence.
|
Model |
the rectangular hole |
the oval hole |
|||||
|
Mesh size(mm) |
70X40 |
90x26 |
100x26 |
100X40 |
65X35 |
70X40 |
80X65 |
|
Pondus |
80-400 g/m2 can be customized. |
||||||
|
Roll Width(m) |
1m,1.2m,1.22m,1.5m,1.8m |
||||||
|
Roll Length(m) |
20-50-100m can be customized |
||||||
|
color |
orange, yellow, green,blue etc. |
||||||
Applications
§ Temporary fencing where an area needs to be cordonned off
§ Cordoning off construction sites / building sites
§ Temporary plastic fence for crowd control
Features
§ Lightweight and fast to install
§ UV Stabilised plastic mesh
§ High visibility orange mesh colour
§ Reusable - easily installed, easy to roll up and use again


