4 月 . 23, 2023 18:54 返回目錄
如何安裝勾花網
在開始之前
了解您是否需要獲得建築和分區許可。
您的柵欄是否符合鄰里契約限制。
建立財產線。
找到您的地下設施。 (藍色放樣)
If you are having your fence installed by someone, are they covered by Workman’s Compensations Insurance?
安裝勾花網的有用工具
捲尺
等級
鉗
鋼絲鉗
大錘
後孔挖掘機
用於攪拌和運輸混凝土的手推車、鏟子和鋤頭
鋼鋸或切管機
字符串/梅森線和賭注
月牙扳手
柵欄拉伸器(可以使用棘輪式動力拉動、滑車滑車或類似裝置。大多數鋼絲拉伸工具可以藉用或在當地租用。)
|
住宅勾花網所需的材料 |
|||
|
描述 |
圖片 |
使用數量 |
購買數量 |
|
護欄布 |
 |
通常以 50 英尺一卷的形式出售 |
|
|
頂軌 |
 |
無柵欄門開口的總長度 |
|
|
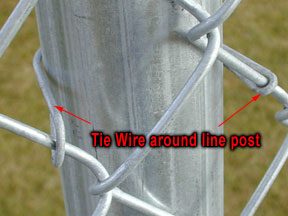
線帖(中級帖) |
 |
將總鏡頭數除以 10 並向上舍入(見下表) |
|
|
終端柱(端柱、角柱和門柱)(通常比線柱大) |
 |
根據需要(每個門 2 個) |
|
|
頂軌套筒 |
 |
每個長度的平頂導軌 1 個。不需要用於楔形頂軌 |
|
|
環帽 |
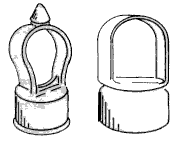 |
每行帖子使用 1 個(左側顯示兩種樣式) |
|
|
張力桿 |
 |
每個端柱或門柱使用 1 個,每個角柱使用 2 個 |
|
|
支撐帶 |
 |
每個張力桿使用 1 個(將導軌末端固定到位) |
|
|
軌端 |
 |
每個張力桿使用 1 個 |
|
|
張力帶 |
 |
每個張力桿使用 4 個或每英尺柵欄高度使用 1 個 |
|
|
馬車螺栓 5/16" x 1 1/4" |
 |
每個張力帶或支撐帶使用 1 個 |
|
|
郵政帽 |
 |
每個接線柱使用 1 個 |
|
|
圍欄紮帶/掛鉤紮帶 |
 |
每 12" 線柱 1 個,每 24" 頂軌 1 個 |
|
|
步行門 |
 |
|
|
|
雙驅動門 |
 |
|
|
|
公鉸鏈/後鉸鏈 |
 |
每個單人行走門 2 個,每個雙驅動門 4 個 |
|
|
馬車螺栓 3/8" x 3" |
 |
每個公鉸鏈 1 個 |
|
|
母鉸鏈/門鉸鏈 |
 |
每個單人行走門 2 個,每個雙驅動門 4 個 |
|
|
馬車螺栓 3/8" x 1 3/4" |
 |
每個母鉸鏈 1 個 |
|
|
叉閂 |
 |
每個步行門1個 |
|
第 1 步 - 測量建築紅線
確保圍欄不超過財產界線。大多數圍欄安裝人員建議將所有柱子設置在物業線內約 4 英寸處。這將有助於避免侵占帶有混凝土基礎的相鄰物業。這很容易通過沿著物業線拉伸一根繩子並將柱子設置在 4 英寸內。
Step 2 - Locate and set Terminal Posts (corner, end, and gate posts are called terminal posts)
門柱之間的距離是通過加上門的實際寬度加上鉸鍊和閂鎖的餘量來確定的。通常步行門需要 3 3/4" 用於鉸鍊和閂鎖,而雙驅動門需要 5 1/2"。接下來,挖洞。
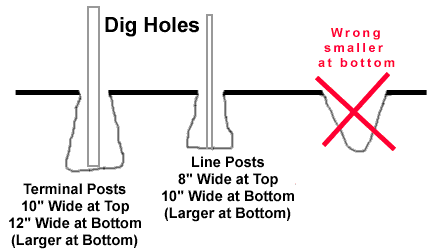
接線柱應設置為比圍欄織物的高度高 2 英寸,接線柱應比圍欄織物的高度低 2 英寸(接線柱應比接線柱高 4 英寸)。使用混凝土設置接線柱混凝土混合物。您可以使用 1 份水泥、2 份沙子和 4 份礫石。還有預混合水泥。使用水平儀確保柱子是直的。柱子應在孔中居中。冠柱基礎因此水將從柱子上排出。
第 3 步 - 找到並設置線柱
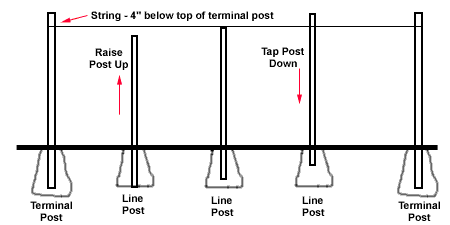
After the concrete around the terminal posts have hardened, stretch a string tight between the terminal posts. The string should be 4" below the top of the terminal posts. Line posts should not be spaced more than 10 feet apart. For example, if the length between two terminal posts is 30 feet, then line posts would be spaced 10 feet apart (see chart below). ig the post holes and set the line posts. Before concrete begins to set, adjust post height by moving post up or down. Top of the line posts should be even with the string. Check with level to make sure posts are straight.
第 4 步 - 將配件應用到接線柱
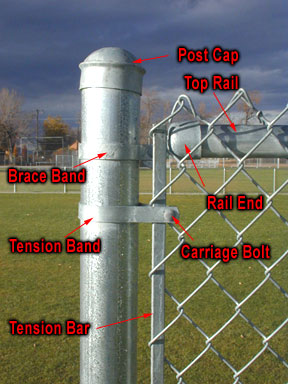
檢查上面的材料清單和配件表。安裝完所有立柱並且混凝土基礎硬化後,將張力帶和支撐帶滑到接線柱上。張力帶的長平面應朝向圍欄外側。注意不要散開或扭曲接頭。現在應用終端柱帽。
第 5 步 - 應用頂軌
將環帽連接到線柱上。將一段頂部導軌插入最靠近其中一個接線柱的眼頂。將導軌末端滑到頂部導軌的末端,並使用支撐帶將其連接到終端柱(如果使用楔形頂部導軌,請勿將楔形末端插入導軌末端)。用馬車螺栓將導軌端固定到支撐帶上。繼續將頂部導軌連接在一起。如果不使用楔形頂部導軌,您將使用頂部導軌套管將導軌末端連接在一起。到達另一個接線柱後,仔細測量並切割頂部導軌,使其與導軌末端緊密配合。用支撐帶和馬車螺栓將導軌端固定到接線柱上。
第 6 步 - 懸掛鍊環 Fabric
沿著柵欄線在地上展開鏈環織物。將張力桿滑過鏈節織物上的最後一個鏈節。將布料立起來,靠在柱子上。用張力帶(已經在接線柱上)將張力桿(剛插入的)固定到接線柱上。使用帶頭的馬車螺栓到圍欄外面。沿著柵欄走,放鬆一下。用幾根紮帶將織物鬆散地固定在頂部導軌上。
To connect two sections or rolls of fence fabric together - take a single strand of wire from one of the sections of fence (Sometimes it is necessary to remove a second wire on the one end in order for the two sections to mesh properly.). Place the two section of fence next to each other (end on end). Join the two sections by winding (corkscrew fashion) the loose strand down through the fence. Join and tighten the knuckles at bottom and top. Now you shouldn't even be able to see where the two sections were connection together.
To remove excess chain link fence fabric - untie both top and bottom ends of fence (knuckles - pliers shown below). Twist the wire in a corkscrew fashion until the fence comes apart. One picket shown in red is turned until the fence is separated.
第 7 步 - 拉伸鏈環織物
織物應該已經固定在柵欄的另一端。在織物的未連接端內大約 3 英尺處插入一個張力桿(可能需要一個額外的)。將圍欄擔架的一端牢固地固定在拉桿上,另一端固定在接線柱上。拉伸織物——正確的張力應該允許用手擠壓時有輕微的變形。織物的頂部應位於頂部導軌上方約 1/2 英寸處。按照步驟 6 中所述,通過添加或移除金屬絲將織物調整到精確長度。在織物末端插入張力桿,並在接線柱上連接張力帶. 拆下柵欄擔架。將紮帶連接到頂部導軌,相距 24"。將紮帶連接到相距 12 英寸的柱子上。擰緊所有支架和張力帶上的螺母。
第 8 步 - 吊門
柵欄完成後,將公鉸鏈安裝到其中一根門柱上,將頂部鉸鏈的銷釘朝下懸掛,將底部鉸鏈的銷釘朝上懸掛。這將防止門被抬起。將門放置到位,將門的頂部與柵欄的頂部對齊。調整併擰緊鉸鏈以允許完全擺動。為單門安裝門閂。雙門使用相同的程序,但安裝中心閂鎖裝置(叉形閂鎖)。
Notes: Post depth can be determined by local weather and soil conditions, terminal posts are normally dug 10" wide and 18" to 30" deep. Depending on the wind and soil conditions you may want to use 8' centers or even a more narrow spacing for line posts. You may want to use longer line or terminal posts depending on the wind and soil conditions in your area. If you want to add privacy slats in the future, make sure the frame work will be strong enough for additional wind load.
Orange barrier fencing mesh is an extruded polypropylene plastic mesh fencing for cordoning off building sites, construction sites, sporting event areas and for general crowd and pedestrian control. Orange barrier fencing mesh is UV stabilised and a bright high visablity orange colour for maximum warning.
We offer various grades/weights of orange safty mesh fence.
Our light grade (110g/m²) and Medium grade (140g/m²) are stretched during the extrusion process to give them a very high tensile strength making them very robust for harsh building sites. Our heavy grade barrier mesh fencing (200g/m²) is unstretched and provides a far more visual orange fence.
|
模型 |
the rectangular hole |
the oval hole |
|||||
|
Mesh size(mm) |
70X40 |
90x26 |
100x26 |
100X40 |
65X35 |
70X40 |
80X65 |
|
重量 |
80-400 g/m2 can be customized. |
||||||
|
Roll Width(m) |
1m,1.2m,1.22m,1.5m,1.8m |
||||||
|
Roll Length(m) |
20-50-100m can be customized |
||||||
|
顏色 |
orange, yellow, green,blue etc. |
||||||
應用
§ Temporary fencing where an area needs to be cordonned off
§ Cordoning off construction sites / building sites
§ Temporary plastic fence for crowd control
特徵
§ Lightweight and fast to install
§ UV Stabilised plastic mesh
§ High visibility orange mesh colour
§ Reusable - easily installed, easy to roll up and use again


